How to Build a Product Configurator in Excel
Written by The Kickflip Team
March 24th, 2023
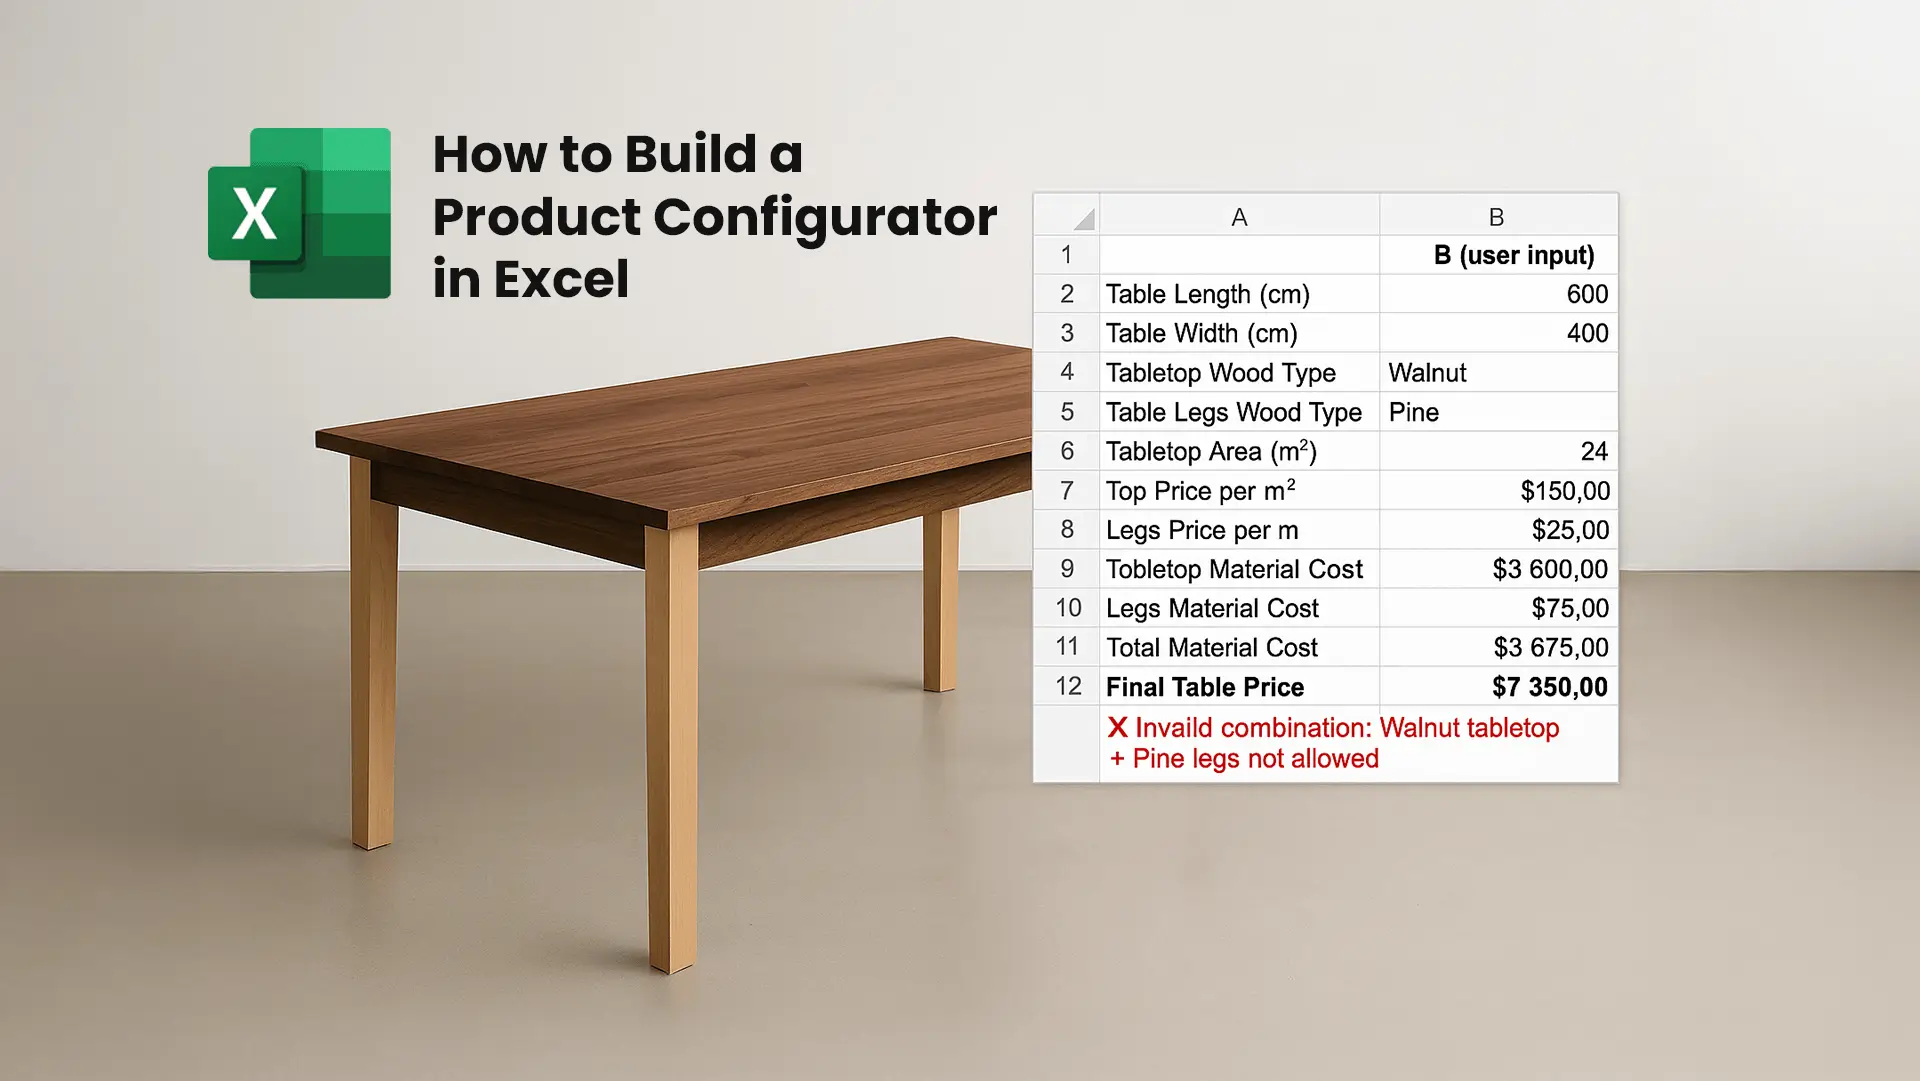
Table Of Contents
Sometimes, you just need a quick way to let people select product options, see the total price, and generate a summary. With a bit of creativity, if you have Excel or Google Sheets, you have everything you need to create a simple configurator.
In this guide, you’ll learn exactly how to build a basic product configurator in Excel using features like drop-down lists, conditional logic, and pricing formulas. We’ll walk you through the step-by-step process so you can set it up yourself.
But we’ll also cover something just as important: when Excel isn’t enough.
While Excel is a great starting point, it quickly shows its limits once you start scaling, selling online, or managing complex product rules. That’s why we’ll also show you how to rebuild the same configurator in Kickflip, a product customization platform that does all the heavy lifting — and integrates directly with your e-commerce store, or lets your sales team create quotes.
Below is a simple workflow you can follow to build your own product configurator from scratch:
How to Build a Product Configurator in Excel
Create workbook with Configurator and Pricing sheets
Within the Configurator sheet, set up input fields for selections
Use VLOOKUP to get prices based on selection
Add formulas to calculate prices
Create logic to block invalid combos: =IF(AND(B4="X", B5="Y"), "❌ Invalid combination", "")
Now that you have a high-level overview, let’s walk through a complete step-by-step tutorial using a concrete example. Let's build a basic Excel product configurator — perfect for a small furniture business that offers made-to-order dining tables.
In this example, we’ll set up a configuration tool that allows sales reps to select:
Table dimensions (length × width)
Wood type for the tabletop
Wood type for the legs
The configurator will then:
Calculate the total price based on dimensions and selected materials
Display an error if certain wood combinations aren’t allowed.
Let’s get started!
Step 1: Prepare a New Workbook
Open Excel and create a new workbook. Name your sheets as follows:
Sheet1 → Configurator
Sheet2 → MaterialPricing
Step 1: Set Up Material Pricing Table
Go to the MaterialPricing sheet and create a pricing reference table:
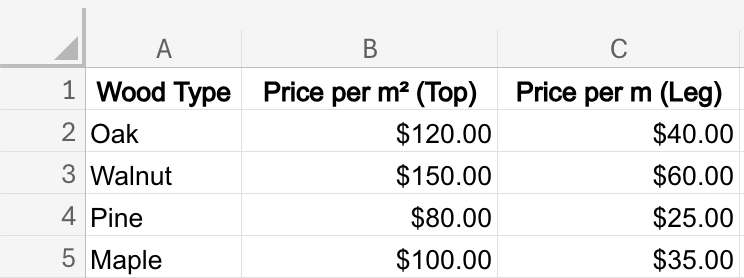
Name the range WoodPrices:
Select the table (including headers)
Go to Formulas > Define Name > type WoodPrices, click OK
Step 3: Set Up Dropdown Lists in Configurator
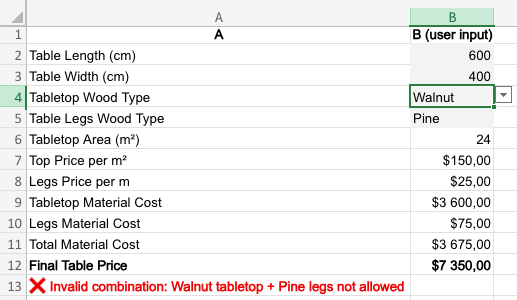
In the Configurator sheet, build the following section for user input and results:
 Now create the dropdowns:
Select B4 and B5
Go to Data > Data Validation
Choose List and set source to =MaterialPricing!$A$2:$A$5
Step 4: Calculate Tabletop Area
We’ll add a calculation row in A6 called “Tabletop Area (m²)”. The goal is to convert centimeters to meters to get square meters.
Formula in B6 should be: =B2/100 * B3/100
Step 5: Calculate Material Prices and Total Cost
Below the Tabletop Area row, we’ll create 5 more rows.
A7: Top Price per m²
Formula B7: =IF(B4="", "", VLOOKUP(B4, WoodPrices, 2, FALSE))
A8: Legs Price per m²
Formula B8: =IF(B5="", "", VLOOKUP(B5, WoodPrices, 3, FALSE))
A9: Tabletop Material Cost
Formula B9: = B6 * B7
A10: Legs Material Cost
Formula B10: = 4 0.75 B8
* Assuming it takes 0.75 m to build a leg.
A11: Total Material Cost
Formula B11: = B9 + B10
A12: Final Table Price
Formula B12: = (B11) 2
Assuming you want to price your product at twice the total material cost.
Step 6: Add Conditional Error Check
Say you don’t want anyone ordering a Walnut top with Pine legs — you can create a simple rule that shows an error when that combo is picked.
Within the cell A13, add this formula:
=IF(AND(B4="Walnut", B5="Pine"), "❌ Invalid combination: Walnut tabletop + Pine legs not allowed", "")
Download example file
That’s it! We’ve successfully built a basic Excel product configurator — complete with drop-down menus, pricing logic and error validation.
👉 Download the example Excel file here to explore the setup and customize it for your own use case.
Why Excel Falls Short for Product Configurators
Excel is great for quick prototypes and internal use, especially for smaller companies, but it’s not built for customer-facing product configurators. It's simply not a great product configurator.
Here’s where it starts to break down:
Difficult to Scale with Complex Products
If your product has more than a few options or conditional rules, managing formulas and data validation quickly becomes a mess. As logic grows, so does the risk of breaking something.
Poor User Experience
Drop-downs and spreadsheets aren’t intuitive for customers. Excel isn’t mobile-friendly, lacks polish, and offers zero visual customization. It looks like… a spreadsheet.
Not Web-Based
You can’t embed Excel into your website or share a real-time link. You’re stuck emailing .xlsx files back and forth — which kills collaboration and slows down sales.
No Real-Time Visualization
There’s no way to preview what the configured product looks like. For anything visual — like furniture, apparel, or packaging — you’re flying blind.
Not Built for Customers
Excel might work for internal quoting tools, but it’s not professional enough for buyers. There’s no branding, no user onboarding, no frictionless flow from configuration to checkout.
No Ecommerce Integration
You can’t plug Excel into Shopify, WooCommerce, or your payment processor. There’s no “Add to Cart” button. No checkout. No tracking. Just a static file.
Prone to Errors and Manual Work
Manual entry, broken formulas, and lack of user permissions make Excel risky for teams. Version control is hard, and there’s no clear audit trail.
How to create a better product configuration experience with Kickflip
If you’re serious about selling configurable products — especially online — Excel isn’t enough. You need a real product configurator software that comes with regular updates, and enjoyable experience and advances features.
That’s where platforms like Kickflip product configurator come in. With real-time visuals, powerful conditional logic, seamless ecommerce integration, and a polished UI, Kickflip lets you build and launch a professional-grade configurator without writing code.
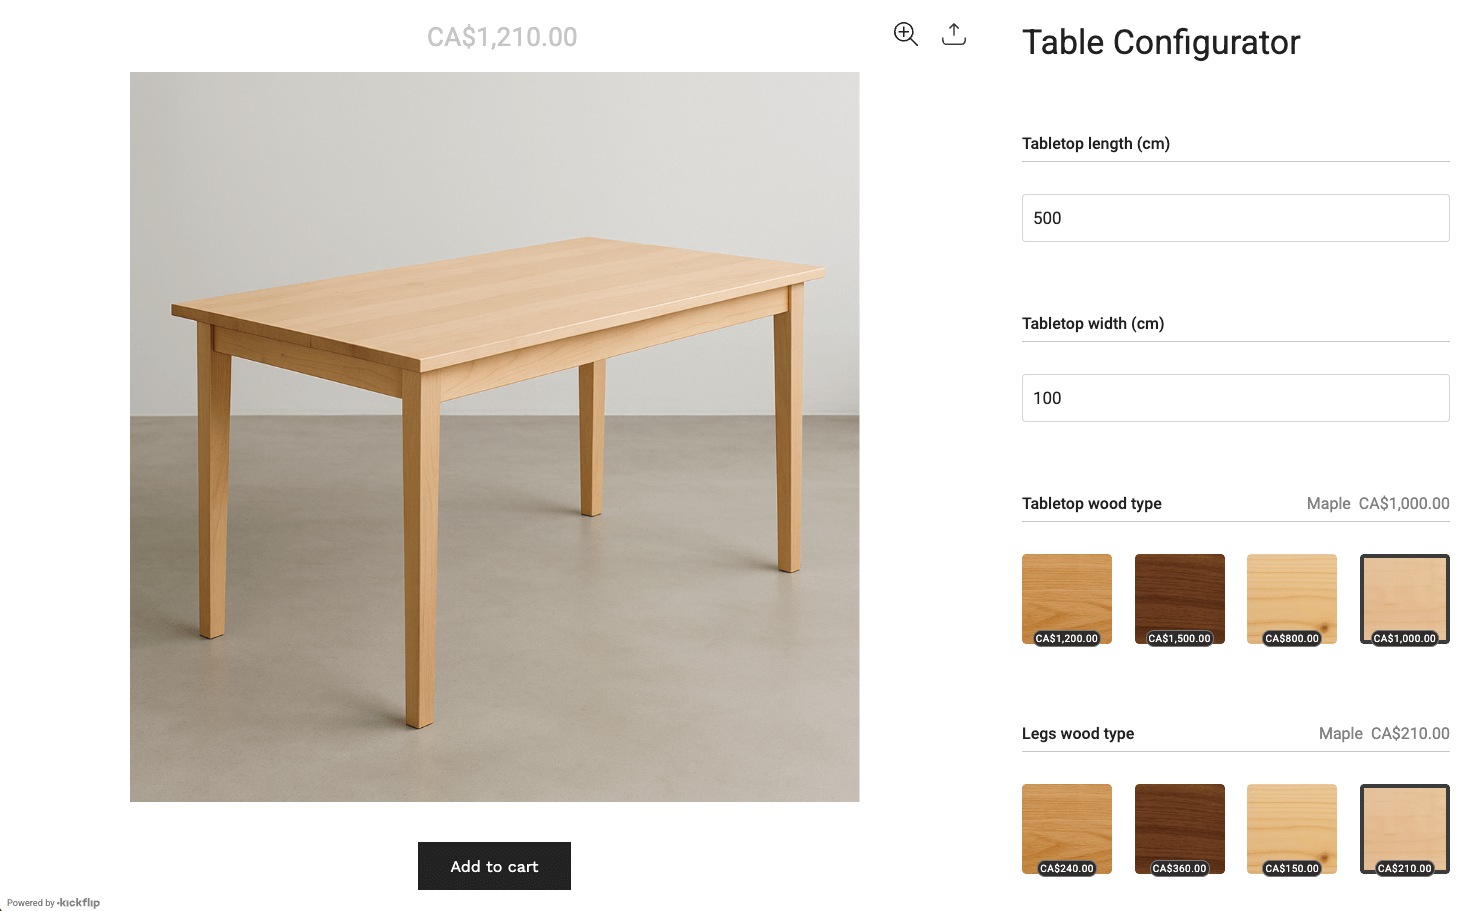
Here’s a quick guide to help you recreate this exact product configurator using Kickflip’s powerful customization platform.
Step 1 : Start your Kickflip free trial
Sign up in just a few clicks — no credit card required — and start building right away.
Step 2 : Create product images
Use Photoshop to create transparent PNG images for each customizable part of your product. Each material variation should have its own image. For example:
Tabletop – Oak
Tabletop – Maple
Legs – Oak
Legs – Maple
...
Make sure all images have the exact same dimensions to align properly in the configurator. The recommended size is 1200 × 1200 pixels. Learn more about creating your images here.
Step 3 : Create a product in Kickflip
Open the Kickflip admin and click on the + Product button to create your configurator. This configurator can later be integrated to your online store, within a product page.
Step 4 : Create Tabletop and Legs wood type questions
In Kickflip, customization options are built using a “question–answer” metaphor. Think of each customizable aspect of your product as a question you’re asking the shopper. Each possible choice they can make is an answer to that question.
We’ll start by creating your ‘Tabletop wood type’ question.
Click on the blue + button. From there, pick Thumbnail as the input type and Image as the display type.
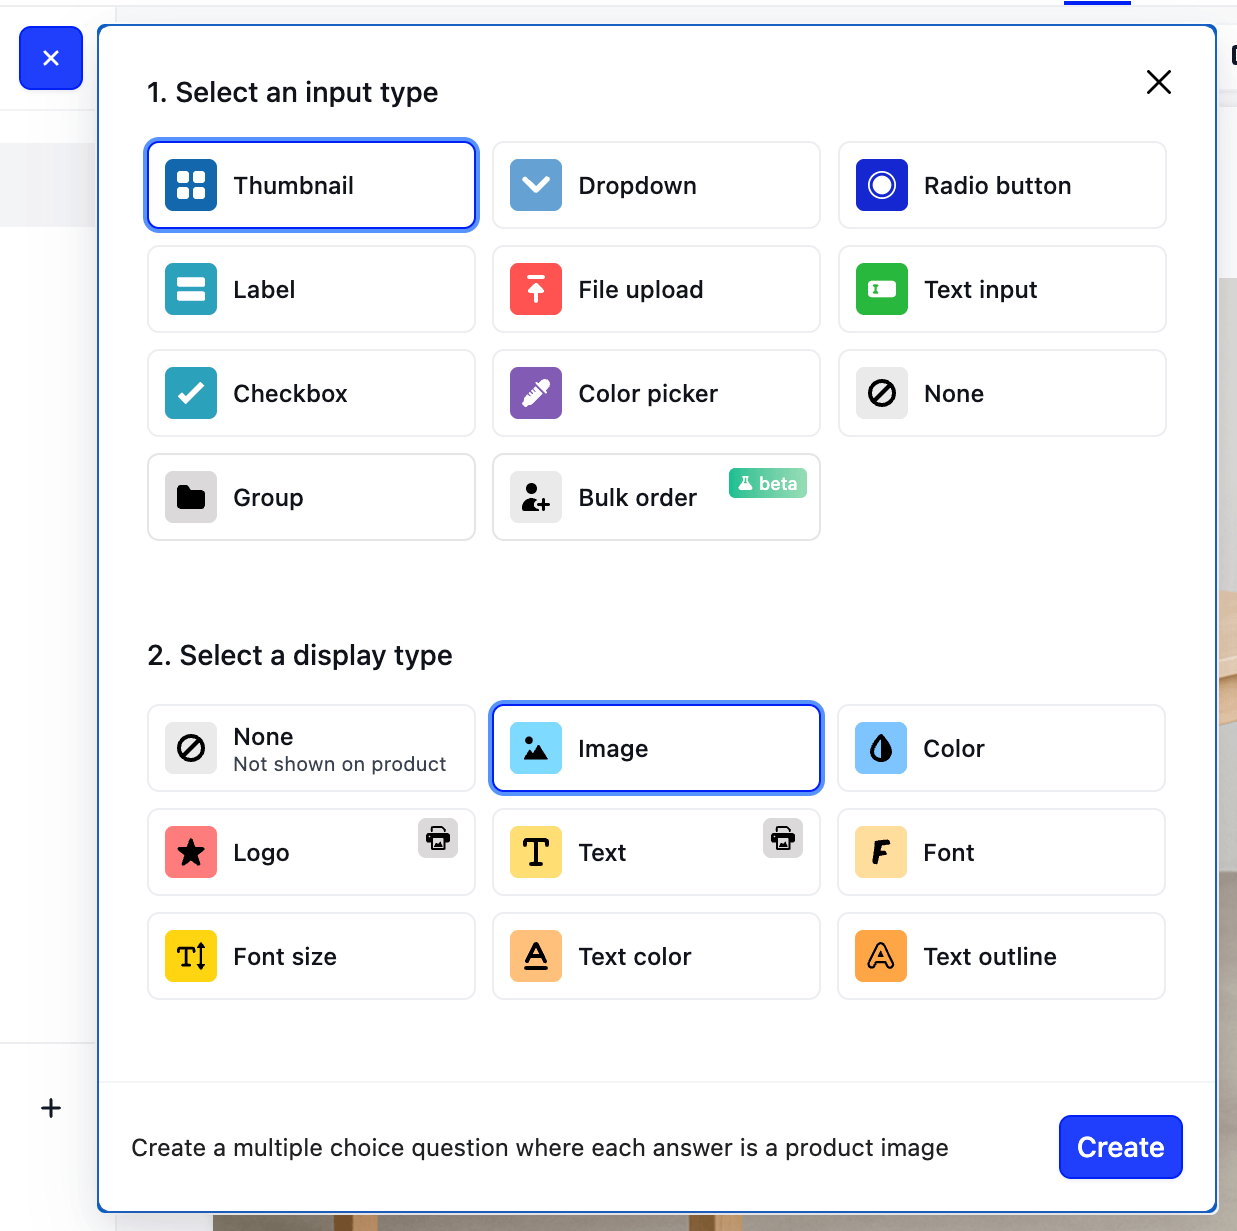
Within the question, we’ll create 4 answers : Oak, Walnut, Pine and Maple.
For each of them, you can
Enter the name in the Title field,
Upload the corresponding image you previously created under View 1.
Upload a thumbnail image representing the wood texture. A simple 300x300 px image will be perfect.
Once these steps are complete, you can now create different table designs by mixing and matching materials for the tabletop and legs.
Step 5 : Create Length and Width Inputs
Now, we want to allow users to input their tabletop length and width.
Click on the blue + button. From there, pick Text input as the input type and None as the display type.
Name that question “Tabletop length (cm)”. Next to Input type, click on the setting icon, under Characters, pick Numbers only.
Duplicate this question and rename it to “Tabletop width (cm)”.
Step 6 : Create pricing equations
All that is left to do is to create the pricing equations to calculate the total price.
Within Kickflip’s product builder, click on the Pricing tab on top of the screen.
Under Additional pricing, click on Equations. Click on + Add Equation. The first equation we want to create is Tabletop width (cm) x Tabletop length (cm) x Tabletop wood type (4) x 2
When you add table top wood type, you can specify the price for each wood type.
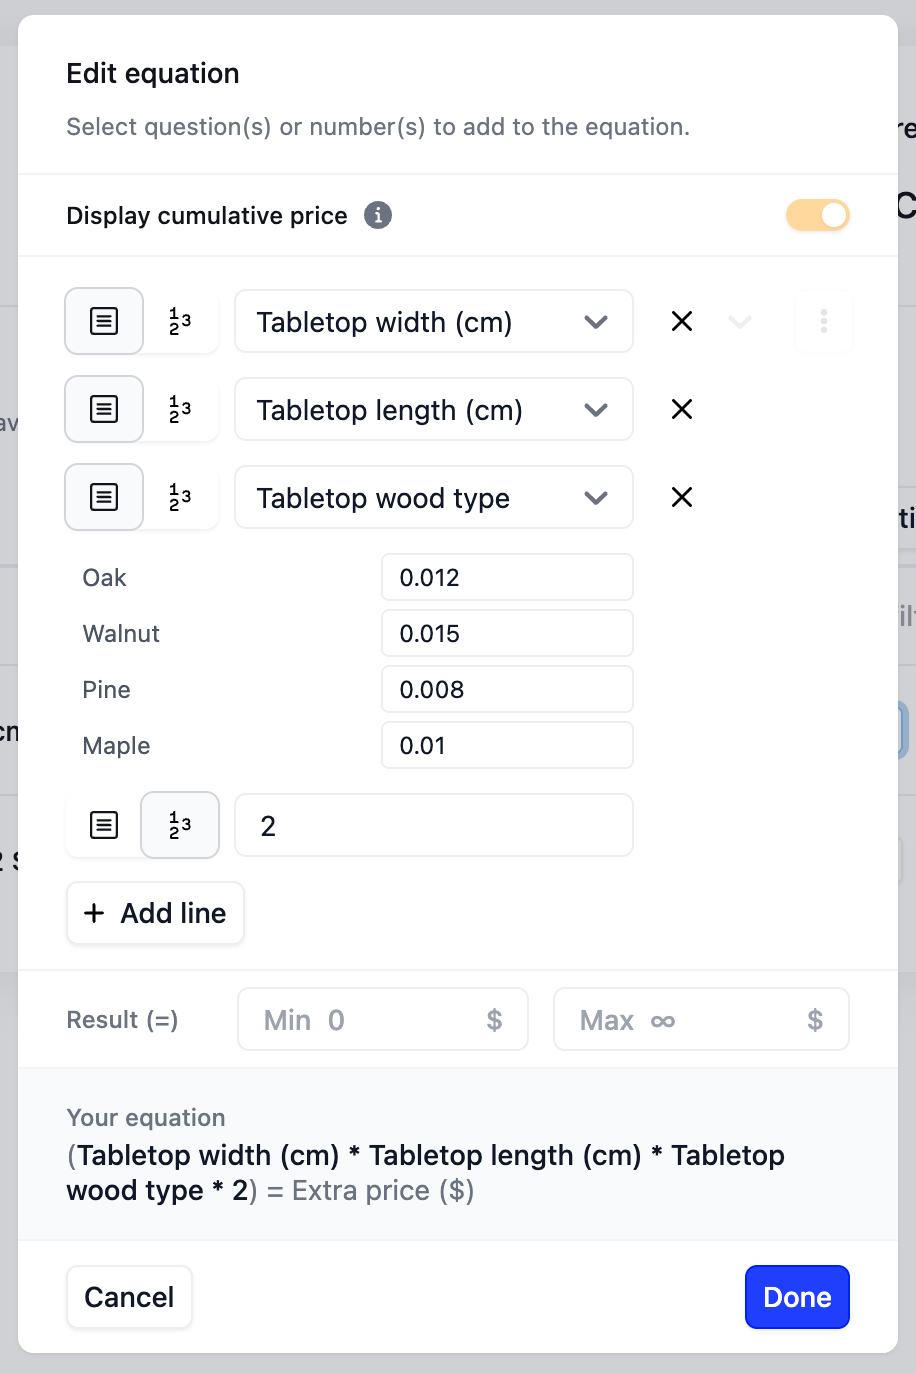
The next equation we want to create is
Legs wood type x 4 x 0.75 x 2
Using the same principle, you can specify the price for each leg wood type.
The equations will be combined to calculate the total price automatically.
Step 7 : Create logic rules
The final step is to add logic rules that block incompatible option combinations. In Excel, we could only show an error message — users could still proceed with the selection. With Kickflip, you can create rules that completely prevent those combinations from being selected.
To set this up in Kickflip’s product builder:
Click on the Logic button.
Click Add rule, then create the following rule:
When Tabletop wood type is Walnut, then Legs wood type should not be Oak.Duplicate that rule and update it to:
When Tabletop wood type is Oak then Legs wood type should not be Walnut.
With just a couple of rules, you’ve ensured that incompatible options are automatically blocked, creating a smoother, error-proof experience for your users.
And that’s it — you now have a fully functional configurator that’s far more powerful than anything built with Excel. You can use it to sell directly on your online store, or, if you prefer handling transactions offline, Kickflip also offers a Configure Price Quote solution that lets customers request a quote instead of checking out.
Final thoughts
Let’s be real, Excel is great for a lot of things, but building a product configurator isn’t one of them. It’s clunky, manual, and doesn’t scale. With Kickflip, we’ve just built a sleek, dynamic configurator that actually works for both you and your customers.
You now have a powerful setup that automates pricing, looks great, and can sell directly through your online store — or let customers request quotes if you close deals offline. Unlike Excel, which is prone to manual errors and messy workflows, Kickflip keeps everything accurate and streamlined, so you can focus on selling instead of fixing mistakes.
Bottom line? You’ve leveled up from spreadsheets to a real solution built for growth.
FAQs
What are the benefits of using an Excel product configurator for businesses?
An Excel product configurator helps businesses streamline quoting, reduce manual errors, and speed up order processing. It’s flexible, cost-effective, and easy to customize without coding. Ideal for small teams, it allows quick updates to pricing and logic, making it a practical solution for managing configurable products and custom orders.
Can I use Excel to create a cpq for custom products?
Yes, it's a good idea to use Excel for building quotes. Use dropdowns for options, VLOOKUP for pricing, and formulas to calculate totals. You can also apply logic rules to flag invalid combinations or highlight missing inputs.
How do I prevent users from entering invalid combinations in my spreadsheets?
You can use IF and AND formulas to display warnings based on selected options. While Excel won’t block input completely, it can flag issues visibly. For stricter control, consider using platforms like Kickflip.
How Excel an product configurator simplifies internal workflows?
An Excel product configurator can help streamline internal workflows and the sales process by organizing pricing, centralizing data, and reducing manual errors. It’s especially useful for small teams managing quotes or custom orders without needing complex software.
Does an Excel product configurator offer a good user experience (UX)?
Not really. While functional, the user interface is limited — Microsoft Excel isn’t intuitive for end users, lacks visual previews, and can be prone to data entry errors. It’s better suited for internal use than as a customer-facing tool.
Can I use an Excel product configurator to generate a bill of materials (BOM)?
Yes, you can use an Excel product configurator to automatically generate a basic BOM. By linking selected options to predefined components and using formulas, the configurator can list required materials and quantities — though it may lack the automation and scalability of dedicated BOM software.
Why do Excel product configurators fall short for growing businesses?
An Excel product configurator lacks scalability, real-time collaboration, and user-friendly design. As product options grow, maintaining formulas and logic becomes complex and error-prone. An Excel product configurator may work short term, but it often fails to deliver the reliability and experience needed for long-term growth or customer-facing use.
Future reading
WooCommerce Product Configurators: Top 5 Apps to Look Into
How to Build a Product Configurator
What is a Product Configurator? (6 Real eCommerce Examples)
Share This article

Written by The Kickflip Team
March 24th, 2023
The Kickflip team is made up of ecommerce specialists, product experts, and engineers behind Kickflip, a product configurator platform for Shopify, WooCommerce, and Wix. Since 2010, we’ve helped thousands of brands scale personalized product experiences, from startups to Fortune 500 companies. On our blog, we share practical insights to help you improve the buying experience and grow your business with product customization.
Maarten Luyckx
Osaka World
The user-friendly interface of Kickflip, combined with excellent customer service, ensured that this project was brought to a successful and beautiful conclusion.
Shopify App Store
May 20, 2021
Marie-Laetitia Rossazza
My Dust Bag
It took me a long time to find the perfect customizer app, and I’m so happy to say that I finally did! Kickflip is truly the best app on the market. The front end and back end are excellent, and the team behind it is incredibly kind and helpful!
Shopify App Store
September 1, 2023
Brad Jurga
All-Star Sporting Goods
Kickflip made everything easy, from designing the builder all the way through launch. We’re designing truly custom equipment for elite baseball players and this platform allows us to have better engagement and excitement around our brand. We’re seeing an instant return.
Shopify App Store
June 16, 2025
Kasper Taylor
CodedInk
My experience with both the product and the support team has been fantastic. The user interface and user experience are excellent. The features are powerful, and the WooCommerce integration is seamless and easy to set up.
G2.com
June 16, 2025
Saber Naceur
Vinylacy
By far, and I truly mean it, the best customizer available on Shopify. It’s easy to understand and manage, offers options for all types of products, and works extremely well. On top of that, it looks beautiful and feels premium. Highly recommended.
Shopify App Store
December 17, 2022
Jesus Guillermo de León Pérez
Dismo
Kickflip is a fantastic tool. It’s super intuitive, easy to use, and packed with capabilities. You don’t have to be an expert or have experience with other products to get started. The support team is also great and very responsive.
Shopify App Store
July 10, 2024
Frieder Urban
Era of Arc
We were looking for an uncomplicated configurator that was quick and easy to set up, offered plenty of design options, and worked reliably with fast loading times. We tested many configurators on the market, and with Kickflip, we found exactly what we needed.
Shopify App Store
October 10, 2024
John Taggart
Jack Harry and Ollie
What a great addition to our business Kickflip has been. It’s been fantastic to offer our customers the ability to personalize their orders. The support has been excellent, and we especially love that the pricing is tied to our success as customers make purchases.
Shopify App Store
May 7, 2021
TJ Garske
The Net Return
Kickflip saves our team a ton of time by eliminating the need to create custom mockups for customers. Customers can build their product themselves and place an order instantly, without any back-and-forth.
G2.com
January 26, 2026
Amin Hasani
CURVD
After extensive research into product customizer tools, we chose Kickflip for many reasons. We don’t like complicating simple tasks for customers, and Kickflip helped us simplify the process and create a seamless customer experience.
Shopify App Store
July 29, 2025