How to Add Products to Shopify (Visual Guide)
Written by The Kickflip Team
July 21st, 2025
Table Of Contents
- 1. How to Add a New Product in Shopify
- 2. How to Duplicate a Product in Shopify
- 3. How to Edit a Product in Shopify
- 4. How to Preview a Product in Shopify
- 5. How to Set Product Availability in Your Sales Channels
- 6. How to Edit the Search Engine Listing (SEO) in Shopify
- 7. How to Archive a Product in Shopify
- 8. How to Delete a Product in Shopify
- 9. How to Add Custom Products to Shopify (with Kickflip)
- Conclusion
- FAQs
Adding products to Shopify is simple once you know the basics.
In this guide, you’ll learn exactly how to add products to your Shopify store, step-by-step. We’ve included clear instructions, helpful tips, and easy-to-follow screenshots for each step, so you can quickly start selling online — even if you’ve never used Shopify or set up an online store before.
Bonus: Want to sell personalized products, like items with custom text, images, colors, or materials? We’ll show you how to do that too.
Ready? Let’s get started.
1. How to Add a New Product in Shopify
Adding products to Shopify is simple — just follow these simple steps:
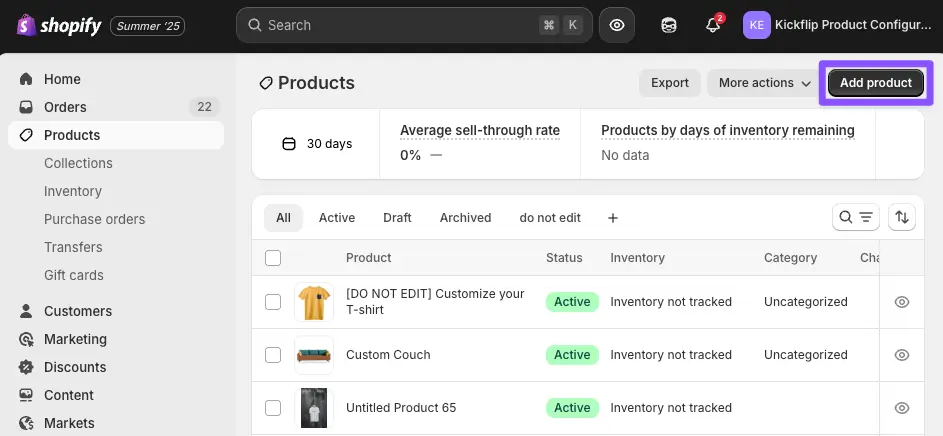
Step 1: Go to Products in your Shopify account
Log in to your Shopify admin dashboard.
Click Products from the left-hand menu.
Step 2: Click “Add product”
At the top-right corner, click the Add product button.
Step 3: Enter your product information
On this screen, enter the basic information about your product:
Title: Enter a clear, descriptive title for your product.
Description: Describe your product clearly to help customers understand exactly what you’re selling. You can also use Shopify’s AI-powered text generator to help you write compelling product descriptions faster.
Media: Upload one or more high-quality product images (.jpg, .jpeg, .png, .webp, .gif), videos (.mp4, .mov) or even 3D models (.glb).
Category: The category field lets you assign a standardized product category to help organize your store and ensure compatibility with sales channels like Google and Meta.
Pricing: Enter your selling price and compare-at price (optional). You can also enter the cost per item, along with your profit and margin, for internal tracking purposes (your customers won't see this).
Inventory: Enter inventory quantities, assign SKUs (Stock Keeping Unit) for internal tracking, and decide whether to track quantity in stock or allow "Continue selling when out of stock".
Shipping: The first step is deciding whether your product is physical or a digital product — if it requires shipping, enter its weight and customs details.
Variants: Variants let you offer different versions of the same product, such as sizes, colors, or materials. Each variant can have its own price, inventory, SKU, and image. Learn more about adding custom product options & variants.
Search engine listing: The Search engine listing section lets you edit how your product appears in search results.
Status: The Status field lets you choose whether a product is Active (visible and available for purchase) or Draft (hidden from your store until it’s ready to publish).
Publishing: The Publishing section lets you control where your product is available by selecting which sales channels (like Online Store, Facebook, or Google) it should appear on. This gives you flexibility to show or hide products across different platforms without removing them from your store.
Product organization: The Product organization section helps you group and manage products more efficiently using fields like Product type, Vendor, Collections, and Tags. These attributes make it easier to organize your store, create automated collections, and improve product filtering and navigation.
Theme template: The Theme template setting in Shopify lets you choose which template from your store’s theme is used to display the product page. This allows you to customize the layout or design for specific products—like using a different template for sale items, bundles, or custom products.
Step 4: Save your product
Once you’ve entered all the information, click Save at the top-right corner.
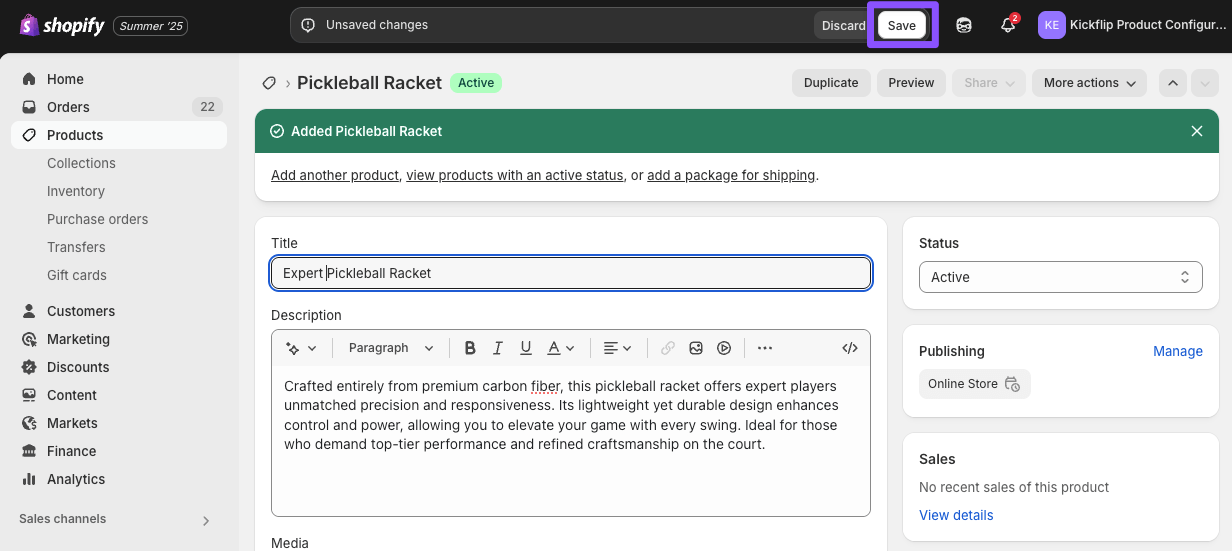
That’s it! You’ve successfully added a new product to your Shopify store.
💡 Tip: Before uploading images to Shopify, optimize them using a tool like TinyPNG to reduce file size without compromising quality. Smaller image files help your store load faster, which improves the shopping experience, reduces bounce rates, and can even boost your SEO rankings — since page speed is a key factor in Google’s algorithm. Optimized images also use less bandwidth, which benefits mobile users and helps your site perform better overall.
2. How to Duplicate a Product in Shopify
Duplicating a product saves you time when adding similar items to your Shopify store. Here’s how to quickly duplicate a product:
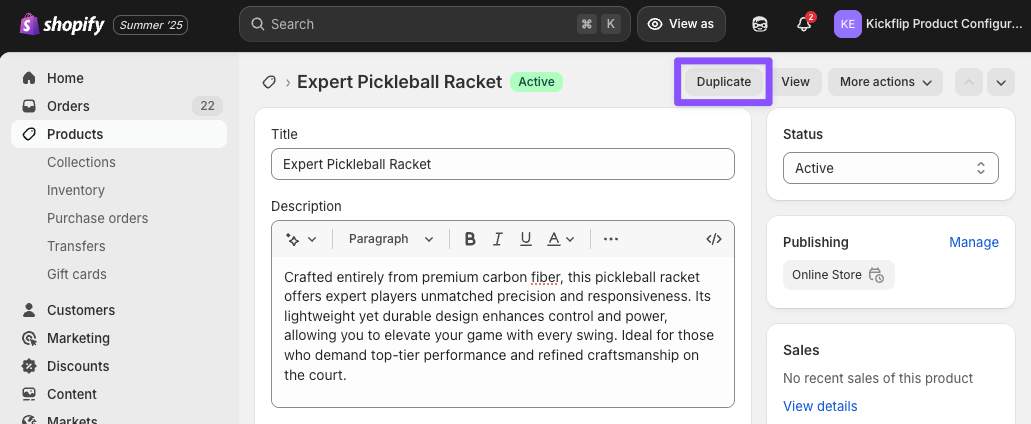
Step 1: Select the product you want to duplicate
From your Shopify admin, click Products in the left-hand menu.
Click on the product you wish to duplicate.
Step 2: Click “Duplicate”
At the top of the product details page, click the Duplicate button.
Step 3: Edit product title and settings
You’ll see a popup window to configure your duplicate product:
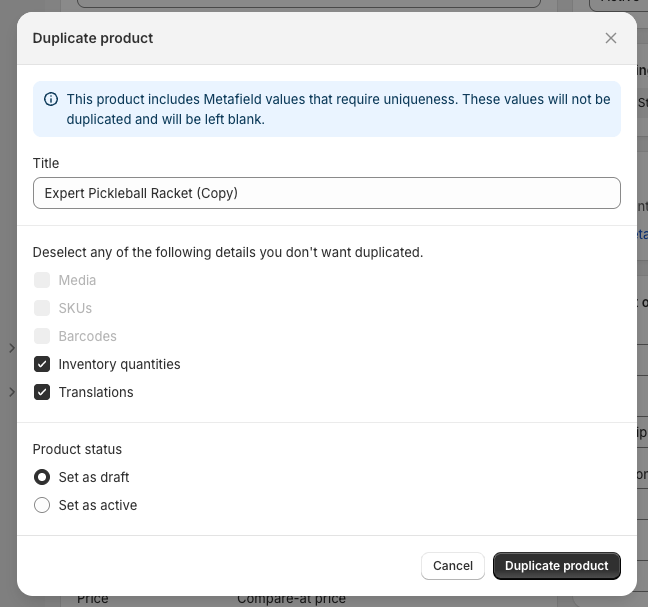
Title: Enter a new, distinct title for the duplicate product.
Product details: Optionally select which details you’d like to copy from the original product.
Product status: Choose whether to set your duplicated product as Draft (not yet published) or Active (immediately available on your store).
Step 4: Finish duplication
Click Duplicate product to create your new product.
Your duplicated product is now ready to edit further or publish directly to your Shopify store.
3. How to Edit a Product in Shopify
Editing your product details in Shopify takes just a few clicks:
Step 1: Select the product you want to edit
In your Shopify admin, click Products from the left-hand menu.
Click the product name you wish to update.
Step 2: Update product details
On the product page, you can easily update:
Description: Change or improve your product description.
Pricing: Adjust pricing information as needed.
Images: Add new images or delete existing ones.
Step 3: Save your changes
After you’ve made your edits, click the Save button in the top-right corner.
Your updated product details are now live on your Shopify store.
💡 Tip:
Regularly updating product descriptions and images helps keep your store fresh and appealing to customers — and it can boost your search rankings, too.
4. How to Preview a Product in Shopify
Shopify makes it easy to preview exactly how your product appears on your store:
Step 1: Select the product to preview
In your Shopify admin, click Products.
Click on the product you want to preview.
Step 2: Click “View”
At the top of the product page, click the View button.
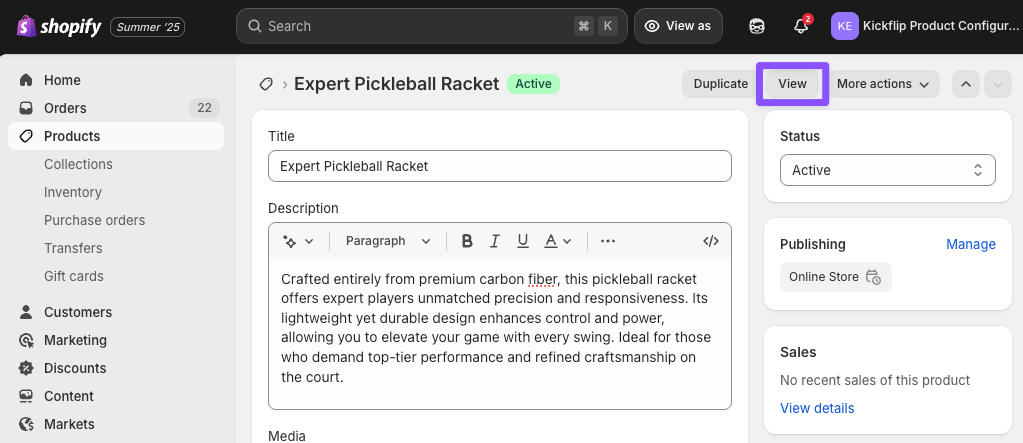
Step 3: View your product
Shopify opens a new tab, displaying exactly how your customers will see the product on your storefront.
That’s it! You can now confidently review your product before it goes live.
💡 Tip:
Always preview products before publishing to ensure all details look great to your customers. You can use the “View as” feature to preview how your product page appears to customers in different languages or countries.
5. How to Set Product Availability in Your Sales Channels
Control exactly where your products appear by managing sales channels in Shopify:
Step 1: Select the product
In your Shopify admin, click Products.
Click the product you want to manage.
Step 2: Click “Manage” in the Publishing section
On the right side, under the Publishing section, click Manage.

Step 3: Choose sales channels
Check or uncheck the boxes next to each sales channel where you want your product to appear or be hidden.
Step 4: Click “Done” and then “Save”
Click Done to confirm your selections.
Click Save at the top-right corner to apply changes.
Now your product will only appear in the selected sales channels, giving you complete control over its visibility.
6. How to Edit the Search Engine Listing (SEO) in Shopify
Optimizing your product’s search engine listing helps customers find your products easily on Google. This process is known as search engine optimization (SEO). Here’s how to do it:
Step 1: Select your product
In your Shopify admin, click Products.
Click on the product you’d like to optimize for SEO.
Step 2: Edit the search engine listing
Scroll down to the Search engine listing section.
Click the pencil icon to edit the SEO details.
Step 3: Optimize title, meta description, and URL
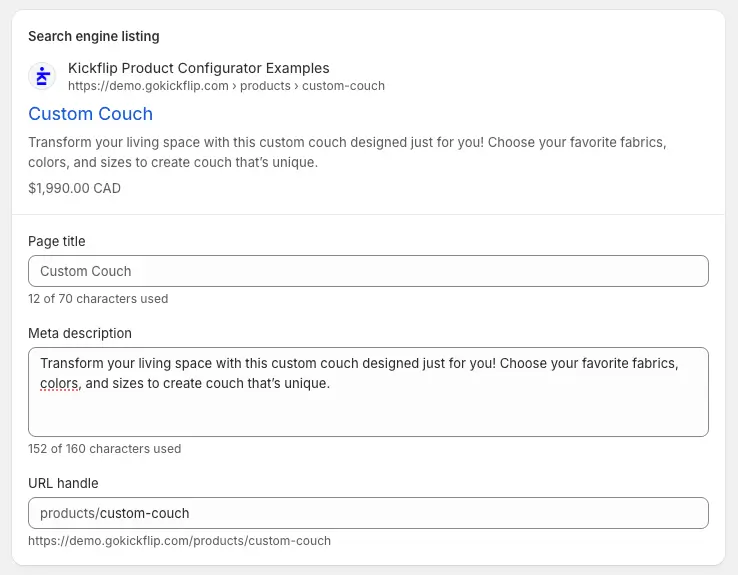
Enter a clear, keyword-rich page title (max 70 characters). Include your primary keyword near the beginning for better SEO. It should accurately describe the content, be unique for each page, and entice users to click by highlighting value or relevance.
Write a concise, engaging meta description that accurately describes your product (max 160 characters). It should be unique, accurately reflect the page content, and ideally include a call to action to boost click-through rates.
Adjust the URL handle if needed, keeping it short and relevant. Instead of using a generic and unreadable URL like /itemA-7836, opt for a descriptive, keyword-rich format such as /leather-laptop-backpack. This not only helps users instantly understand what the page is about, but also improves search engine visibility by including relevant terms in the URL.
Step 4: Save your changes
Click Save at the top-right corner of the page.
Your product is now optimized to appear higher in search engine results, and attract more potential customers!
💡 For more SEO tips, check out this Shopify Product Page SEO guide.
7. How to Archive a Product in Shopify
Archiving products hides them from your store without permanently deleting them. Here’s how you can quickly archive a product:
Step 1: Select the product
In your Shopify admin, click Products.
Click the product you want to archive.
Step 2: Click on "More actions" and then “Archive product”
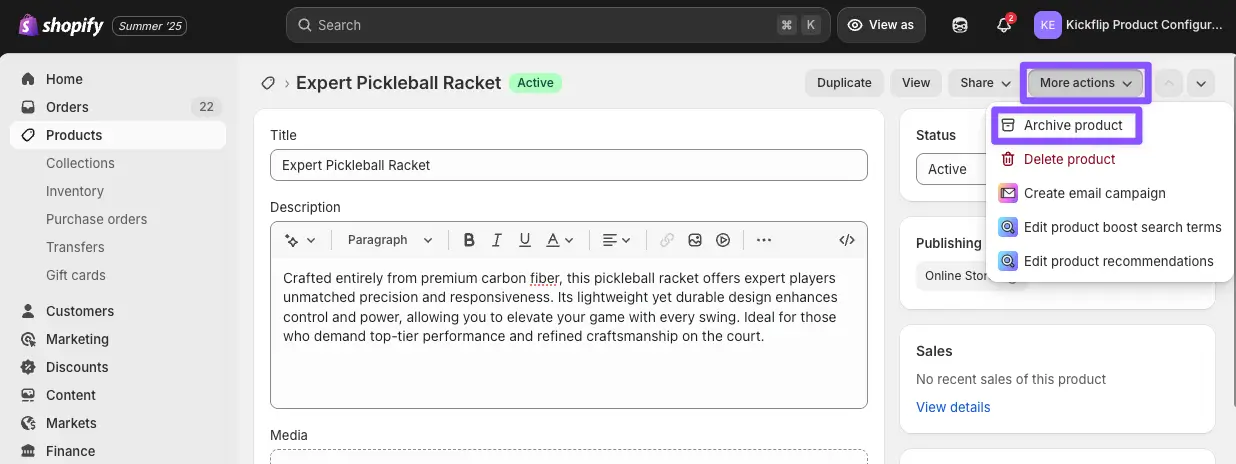
Click on More actions.
Click Archive product.
A confirmation window will appear, click Archive product again to confirm.
Your product is now archived and hidden from your store, but you can easily restore it later.
💡 Tip:
Archiving is ideal for seasonal products or items temporarily unavailable, as it preserves your product data without permanently deleting it.
8. How to Delete a Product in Shopify
Deleting a product permanently removes it from your Shopify store. Here’s how to do it:
Step 1: Select the product
From your Shopify admin, click Products.
Click the product you wish to permanently delete.
Step 2: Click on "More actions" and then “Delete product”
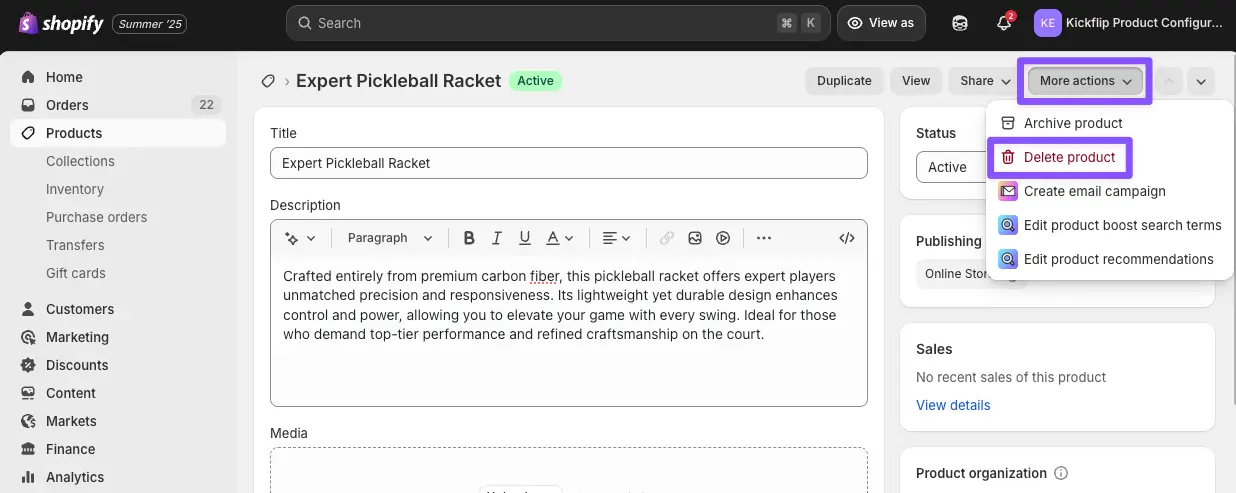
Click on More actions.
Click the Delete product button.
A confirmation popup will appear.
Click Delete product again to confirm.
Your product is now permanently removed from your store and can’t be restored.
💡 Tip:
Only delete products when you’re certain you no longer need them. To temporarily hide a product instead, consider archiving it.
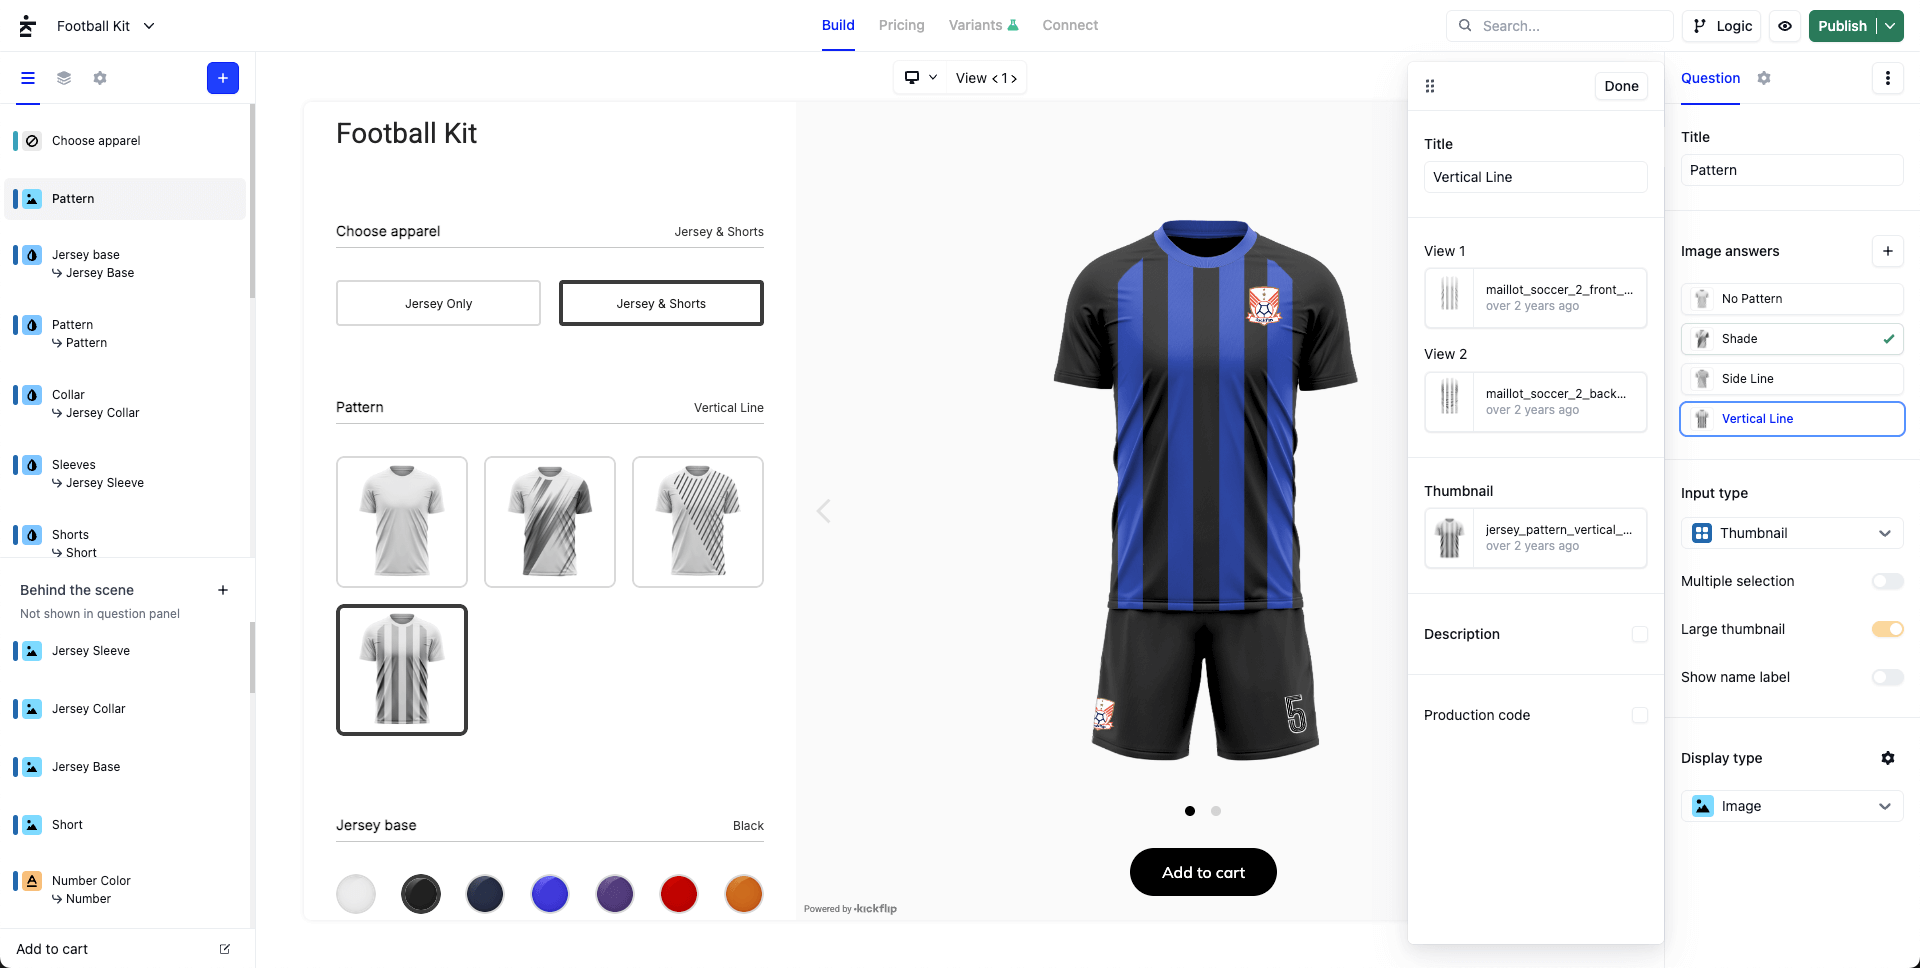
9. How to Add Custom Products to Shopify (with Kickflip)
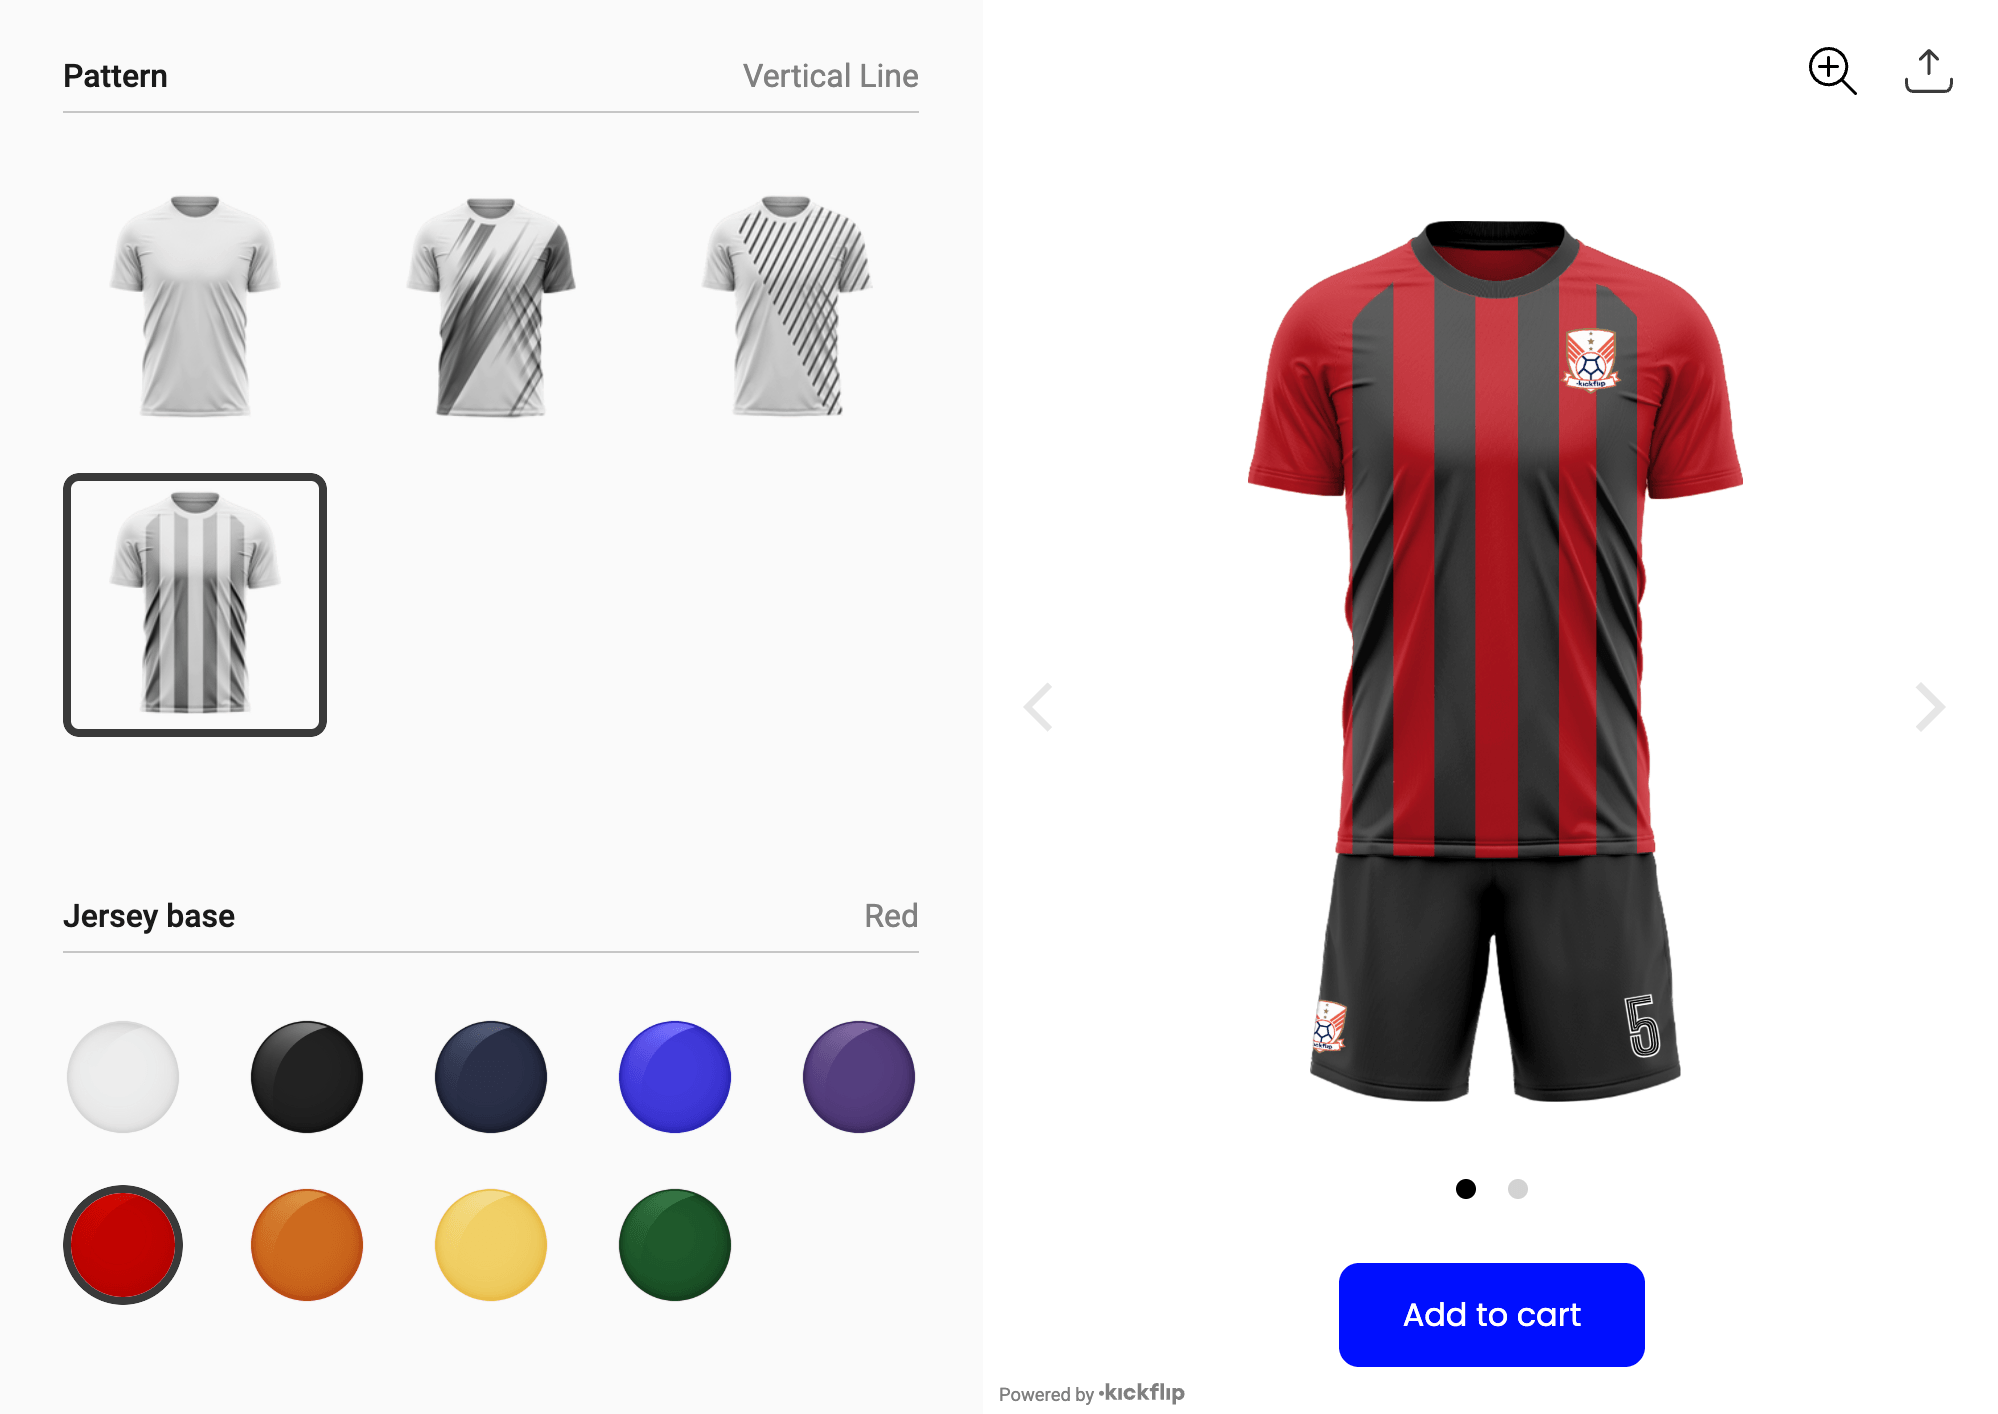
If you want to offer personalized products — like letting shoppers choose materials, colors, components, or even upload their own images — Kickflip supercharges your Shopify store with everything you need to bring those options to life.
Whether you’re selling something as simple as a printed T-shirt or as complex as a custom watch — where customers can select the dial style, strap material, engraving text, and packaging — Kickflip gives you full control over the creation of that kind of customer experience, from design to purchase.
With just a few steps, you can create a fully personalized product from the ground up. Here’s how to do it with Kickflip:
Step 1: Install Kickflip from the Shopify App Store
Go to the Kickflip app page on Shopify and click Install.
Follow the prompts to install and authorize the app.
Step 2: Create Your Custom Product in Kickflip
Once installed, launch Kickflip from your Shopify admin and:
Create a new product.
Add your customization options: text fields, image uploads, color selectors, components, and logic rules.
Set base pricing and define extra charges (e.g. for add-ons, logos, custom materials).
Use simple or complex pricing formulas if needed.
Step 3: Connect the Product to Shopify
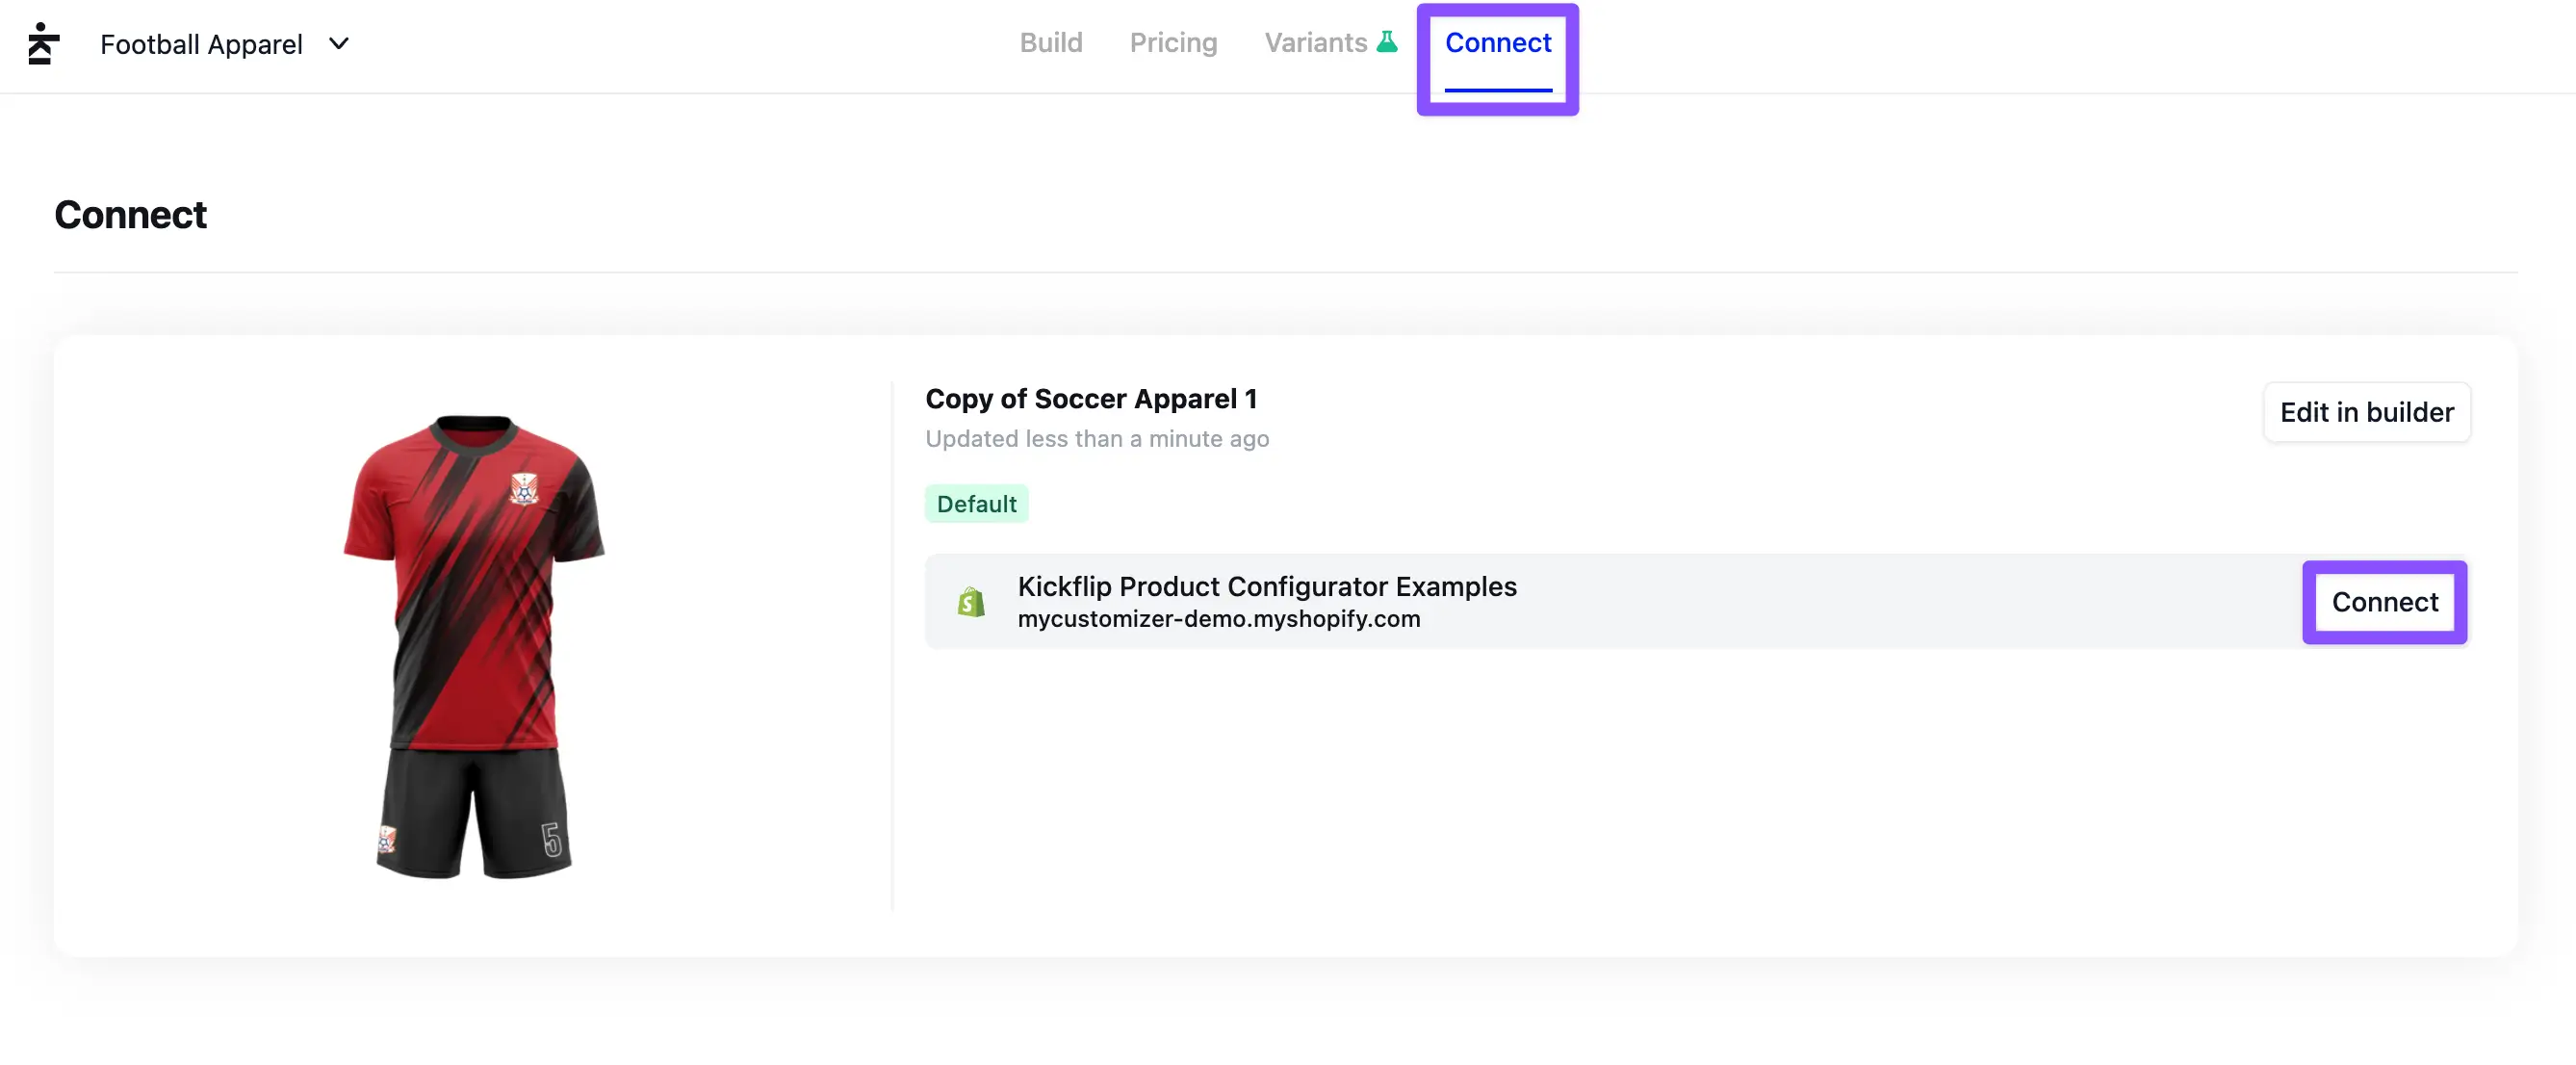
Go to the Connect tab inside Kickflip.
Select the product you want to publish.
Click Connect to Shopify.
Kickflip will automatically create a new product in your Shopify store that includes the customizer.
Why Use Kickflip for Custom Products?
✅ Premium personalization experience
Customers can see their changes in real-time—leading to higher engagement and conversions.
✅ Fewer ordering errors
Every order is automatically configured based on the customer’s exact input.
✅ Easy to set up
No code required. Build your first product in minutes using Kickflip’s intuitive interface.
Conclusion
Now you know exactly how to add, edit, and manage products in your Shopify ecommerce. From uploading your first product to organizing tags and setting availability across sales channels, you’re ready to run your online business with confidence.
And if you’re looking to go further by offering personalized products with options like colors, materials, components, or custom text and images, Kickflip makes it easy to bring that experience to life.
Ready to create custom products your customers will love? Try Kickflip free today.
FAQs
How can I add custom fonts or text options to a Shopify product?
To add custom fonts or text options to a product, install the Kickflip app from the Shopify App Store. The next step is to create your product inside Kickflip and add text fields and the fonts you want to offer. From there, connect this custom product to your Shopify account and your go to go.
How to change the URL of a product page in Shopify?
Go to 'Products', select your item, and scroll to 'Search engine listing'. Click the pencil icon to edit the URL. Hit Save. Use a descriptive URL including your main keyword to improve SEO. For example, instead of /item837135, use /leather-laptop-backpack to clearly indicate what the product is.
What’s the difference between archiving and deleting a product in Shopify?
Archiving a product removes it from your online store without deleting it from your product catalog, so you can restore or reuse it later. Deleting permanently removes the product from both your store and catalog. Use archiving to temporarily hide items, and deleting when they’re no longer needed at all.
Future reading
How to add custom product options & variants on Shopify
8 Best Shopify Apps For Every Store Needs
Can You Do Personalization on Shopify? (Step-by-Step Guide)
Share This article

Written by The Kickflip Team
July 21st, 2025
The Kickflip team is made up of ecommerce specialists, product experts, and engineers behind Kickflip, a product configurator platform for Shopify, WooCommerce, and Wix. Since 2010, we’ve helped thousands of brands scale personalized product experiences, from startups to Fortune 500 companies. On our blog, we share practical insights to help you improve the buying experience and grow your business with product customization.
Maarten Luyckx
Osaka World
The user-friendly interface of Kickflip, combined with excellent customer service, ensured that this project was brought to a successful and beautiful conclusion.
Shopify App Store
May 20, 2021
Marie-Laetitia Rossazza
My Dust Bag
It took me a long time to find the perfect customizer app, and I’m so happy to say that I finally did! Kickflip is truly the best app on the market. The front end and back end are excellent, and the team behind it is incredibly kind and helpful!
Shopify App Store
September 1, 2023
Brad Jurga
All-Star Sporting Goods
Kickflip made everything easy, from designing the builder all the way through launch. We’re designing truly custom equipment for elite baseball players and this platform allows us to have better engagement and excitement around our brand. We’re seeing an instant return.
Shopify App Store
June 16, 2025
Kasper Taylor
CodedInk
My experience with both the product and the support team has been fantastic. The user interface and user experience are excellent. The features are powerful, and the WooCommerce integration is seamless and easy to set up.
G2.com
June 16, 2025
Saber Naceur
Vinylacy
By far, and I truly mean it, the best customizer available on Shopify. It’s easy to understand and manage, offers options for all types of products, and works extremely well. On top of that, it looks beautiful and feels premium. Highly recommended.
Shopify App Store
December 17, 2022
Jesus Guillermo de León Pérez
Dismo
Kickflip is a fantastic tool. It’s super intuitive, easy to use, and packed with capabilities. You don’t have to be an expert or have experience with other products to get started. The support team is also great and very responsive.
Shopify App Store
July 10, 2024
Frieder Urban
Era of Arc
We were looking for an uncomplicated configurator that was quick and easy to set up, offered plenty of design options, and worked reliably with fast loading times. We tested many configurators on the market, and with Kickflip, we found exactly what we needed.
Shopify App Store
October 10, 2024
John Taggart
Jack Harry and Ollie
What a great addition to our business Kickflip has been. It’s been fantastic to offer our customers the ability to personalize their orders. The support has been excellent, and we especially love that the pricing is tied to our success as customers make purchases.
Shopify App Store
May 7, 2021
TJ Garske
The Net Return
Kickflip saves our team a ton of time by eliminating the need to create custom mockups for customers. Customers can build their product themselves and place an order instantly, without any back-and-forth.
G2.com
January 26, 2026
Amin Hasani
CURVD
After extensive research into product customizer tools, we chose Kickflip for many reasons. We don’t like complicating simple tasks for customers, and Kickflip helped us simplify the process and create a seamless customer experience.
Shopify App Store
July 29, 2025