How to add custom product options & variants on Shopify
Written by Renaud Teasdale
February 12th, 2024
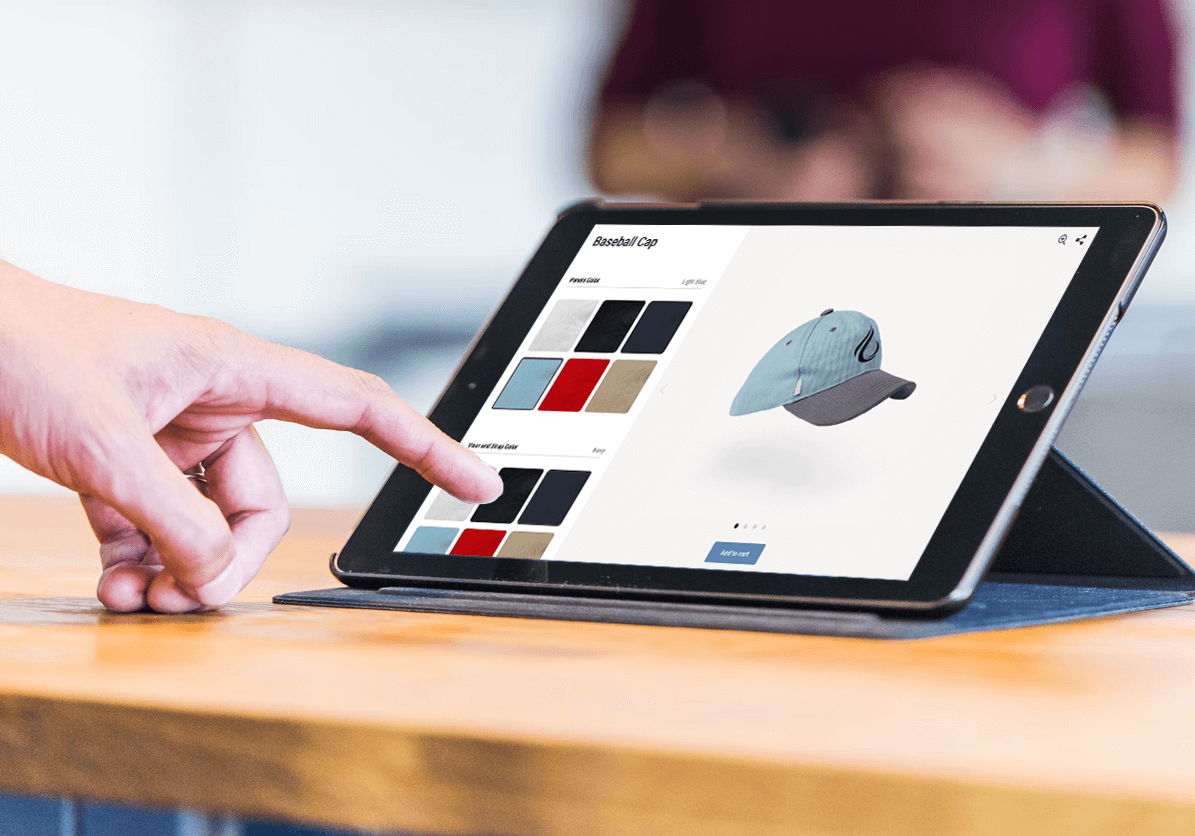
Table Of Contents
- How can custom product options help increase sales on your Shopify store?
- How Shopify defines product options & variants
- How to add multiple product options on Shopify using a product customizer app like Kickflip
- Enhancing the user experience with custom product options
- Best Custom Product Options Shopify Apps : How to choose a custom product option app
- Popular Shopify apps for custom product options
- Conclusion
Most Shopify stores are using product options to give multiple choices to their customers. When it comes to Shopify product options, there are a few best practices to keep in mind. This comprehensive beginner's guide to Shopify custom product options will illuminate all aspects, ensuring your customers can effortlessly explore and select their preferences, leading to a seamless purchase experience.
How can custom product options help increase sales on your Shopify store?
Custom product options on your Shopify store allow customers to personalize and customize their purchases, creating a unique and tailored shopping experience. By offering options like color, size, engraving, or customizations, you can attract more customers, increase order value, and ultimately boost sales.
How Shopify defines product options & variants
Shopify custom product options are categories of attributes that can be added to any item on an online store. Usually, these custom options are provided to respond to the customer’s preferences.
For example, an apparel ecommerce will give its customers the ability to choose between sizes, colors and patterns. That’s 3 options, in other words 3 customization categories where you can add specific choices and combinations.
Shopify product options limits
Within Shopify, you can add up to 3 options to a product. For example, you could add : Size (1), Color (2), Fit (3). For each options you will then add attributes:
Size: S, M, L
Color: Red, Blue, Green
Fit: Regular, Wide
For every combination, Shopify generates a variant, for example :
S / Red / Wide
M / Blue / Regular
M / Red / Regular
Note that there is a limit of 100 variants to all your custom product options combined. Let’s say you are planning to add 7 sizes, 11 colors and 2 materials, you would exceed that limit: 7 x 11 x 2 = 154.
To overcome this variant limit, we recommend using a Shopify product customization app. That’s the best value for money and time that you can get. This solution not only allows you to add unlimited options and variants, but if you choose the right personalization tool, you will also get a better purchasing experience.
In order to offer your customers a wide selection of options, you need to set up your custom product options correctly. Let’s see how to do this within Shopify variants settings.
UPDATE: Shopify recently announced they will increase the variant limit to 2000. At the moment, the APIs are in developer preview and can only be used by developer stores but Shopify plans to to make this upgrade available to all Shopify users eventually. You can apply here to request access.
How to add custom product options in Shopify
You can add custom product options and variants to your Shopify store by following these steps. It is recommended that you use this method if you have fewer than 100 variants and Shopify product options such as a few sizes.
To create your first custom product with multiple multiple product options and offer more advanced customization such as custom text, engraving, multiple colors or components, or uploading an image/logo on a product, jump to this section: advanced product options.
Steps to add custom product options and variants
Follow these steps to add Shopify variants to your product:
Login to your Shopify admin and open your product.
Under Variants, click on “Add options like size or color”
Select the option type you want to add. Shopify lets you choose between size, color, material or style.
Add your option values, then click on Done.
From there, Shopify generates the variants.
 Displaying the right image based on selected options
To show the correct product image based on the options selected by your customer, you will firstly have to create an image for every variation option. Once you are done, here’s how to add them to your product in Shopify.
Under Variants, next to the variant where you want to display an image, click on the dotted square containing an image icon with a plus sign, on the left of the list.
A modal named “Select variant image” will appear. Click on “Add image”.
Select the image you want to upload.
Make sure it is selected and click on “Done”.
 Assigning pricing to variants
You can assign different prices to variants. You will need to adjust them for each variant from the variant details area within the product page.
Within the Variants area of your product, there is a Price column.
Simply edit the price next to the variant.
Hit the save button when you are finished.
As you can see, Shopify provides you with a simple way of adding a few options to a product. If you plan to offer only two or three options, it might be a good solution.
To add more product options or variants, add multiple components to a product or allow your customers to upload an image or enter a text, we recommend using a product customizer app like Kickflip.
To create a more advanced product customization experience, keep reading the next section!
How to add multiple product options on Shopify using a product customizer app like Kickflip
The easiest way to add custom product options is by using an app that provides this functionality. By using an app like Kickflip, you can add a lot more options and variants to your products and increase their customization, all while creating a better purchasing experience for your customers. In this section, we'll see how to add multiple product options, including multi-component products, adding images, text, logos, conditional logic, and extra prices. Having your own account will make it much easier to follow along. So go ahead and get started for free before you continue.
How to create customizable products in Shopify
Before you proceed further, I encourage you to watch this brief yet insightful video by Jake on the Casual Ecommerce channel. This video provides an excellent foundation for the upcoming discussion on creating customizable products in Shopify. Jake expertly guides you through the process of establishing a custom product builder directly within your Shopify product page.
Adding multiple image variants to a product
There are many reasons why you might want to add multiple images to display your product :
to display a product component, like a section of a sofa or a diamond on a ring;
to display color variations;
to display material choices.
Steps to add multiple product variant images
1. The first thing you need is images of each component of your product. For example every section of a sectional sofa will need their own image in order to show or hide the part in the product preview.
2. Create image questions. This type of question displays an image based on the customer's choice.
 3a. Within your image question, upload every image variant. We have added a color option for the baseball cap panel in the image below, and then uploaded each image in every color.
3b. For color options you can apply colors dynamically on your image using Kickflip’s color application technology. By doing so, you will be able to upload only one image and add color dynamically as needed. You can save a lot of time by doing this.
Adding text on a product
Creating Shopify personalized products is an excellent strategy to stand out in the competitive e-commerce landscape. With Kickflip, your customers can add personalized text to their products or choose a preset text. They can also choose their preferred font, a text color or even add a text outline. You can fix the position of the text in a specific area on the product or you can allow your customers to move it around and see a preview of the final product before purchasing.
 Steps for adding text on a product
Add a text question by selecting “Text input” under input type and “Text” under display type;
Move your text where you want it to appear by dragging and dropping it.
Edit your text settings : size, alignment, color, etc.
If you want your text to be movable, make sure your text is multiline, create a print area, add your text to it and toggle on the Move and Rotate settings.
Try it now on your own product
Adding a logo or image on a product
You can allow your customers to upload their own images to your product. You can predefine a size and area, or you can let your customers move, resize and rotate their image. You'll be able to download the image they have uploaded and even generate print-ready files if you need to.
 Steps for adding a logo/image on a product
Add a question and select “File upload” as the input type and “Logo” as the display type.
Move your logo where you want it to appear and resize it using the bounding box.
Edit your text settings : size, alignment, color, etc.
If you want your logo/image to be movable, create a print area, add your logo to it and toggle on the Move, Resize and Rotate settings.
Try it now on your own product
Adding conditional options with logic rules
Rules allow you to restrict or force options based on other choices. They are useful for eliminating specific combinations of designs that shouldn't exist. Rules are created from natural language sentences, for example: When size is small then panel color should not be red.
 Steps to add conditional rules
Within Kickflip’s product builder, hit the Logic button.
Click on + Add rule
Create your rule and click on Add.
Try it now on your own product
Adding extra prices on product options & variants
Kickflip makes it easy to set the price that you want to charge for your base product and for extra options within your product. For example you could add $10 to the total price when a client adds an embroidery name on your product.
 Step to add extra pricing
Within Kickflip’s product builder, click on the Manage tab.
Under Base price, set your base price.
Click on + Add extra price, select the question and answer for which you want to add an extra price, set the extra price and hit Add.
Hit Save to publish your new pricing.
Try it now on your own product
Enhancing the user experience with custom product options
User experience is crucial for online stores, as it can literally mean the difference between zero sales and a 30% conversion rate! Custom product options are one of the best ways to enhance the user experience and boost sales conversions. By giving the ability to preview their personalization, customers feel more in control of their purchase decisions. This level of customization can improve customer satisfaction & loyalty, ultimately enhancing the overall customer experience. It is also a great way to differentiate an ecommerce store from its competitor.
Best Custom Product Options Shopify Apps : How to choose a custom product option app
There are many options available when it comes to Shopify custom product apps. Choosing the right one on the Shopify App Store can be challenging. Here are some criterias you can look at while shopping for your app:
Features: You should try to choose an app that has a complete set of features. This way, it will last with your product and store over time. You don't want to spend time and effort setting up your custom products only to find out you can't add another option. A product option app should offer a lot of flexibility in customization options, real-time product previews and mobile responsiveness.
Ease of use: The app should be user-friendly, with an intuitive interface. You should be able to set up your product yourself, add or remove an option whenever you want. Otherwise you might have to pay setup or maintenance fees for every modification you’d want. Moreover, it must be easy to use for your customers since the ultimate goal is to increase your conversion rate.
Compatibility: Verify if the app has a built-in integration with your e-commerce platform. Some apps also provide API access to integrate by yourself with any ecommerce store. If you or your team have the time and competence that is also a good solution.
Support: Most people don't think about it, but when you need help with something impacting the sales of your ecommerce store, it is essential that you receive prompt assistance. Great support and onboarding will also make a huge difference while setting up your custom products.
Pricing: As any other software, features usually come at a certain price. There is a wide range of pricing in the custom product options app field. Some are fixed monthly prices based on usage of the app, number of products, and features. Others are only based on transaction fees made from the customizer app. Make sure to do some calculation on what is best for your business and what seems right to you.
Reviews: Visit review sites such as G2, Capterra and Shopify's app marketplace to find out how different types of clients are using the app. You will also get a better understanding of their clients’ satisfaction.
Considering these different factors, it will be easier for you to decide which app to use. Why not start free trials with a few of them? That way, you will get to try out the features, interact with their support team and decide which one suits your needs the best. If you need technical help setting up or customizing these apps in your Shopify store, this list of top Shopify development companies can help you find the right partner.
Popular Shopify apps for custom product options
We’ve created a complete list of Shopify apps. This includes pros and cons of each app to help you make your mind on the custom product option app you need.
View the ultimate Shopify apps for custom product options
Conclusion
We’ve seen how Shopify allows you to add options to a product. Unfortunately the option quantity and variant limit are very low, making this solution suitable only for very simple products. Using an app like Kickflip is a must for brands that want to offer their customers a more advanced product customization experience. It empowers you not only to circumvent Shopify’s variant limit but to create and maintain high quality product customizers.
Give Kickflip a try and start adding custom product options now. We have an overall rating of 4.6 on the Shopify App Store and getting started is completely free!
Future reading
Product Bundling on Shopify: The Ultimate Guide
Customizable Products in Shopify - The Ultimate Guide
Share This article

Written by Renaud Teasdale
February 12th, 2024
Renaud Teasdale is the co-founder and CEO of Kickflip, a product customization platform for e-commerce brands. Since 2010, he’s been focused on helping merchants turn product personalization into a scalable, high-impact revenue channel.
Maarten Luyckx
Osaka World
The user-friendly interface of Kickflip, combined with excellent customer service, ensured that this project was brought to a successful and beautiful conclusion.
Shopify App Store
May 20, 2021
Marie-Laetitia Rossazza
My Dust Bag
It took me a long time to find the perfect customizer app, and I’m so happy to say that I finally did! Kickflip is truly the best app on the market. The front end and back end are excellent, and the team behind it is incredibly kind and helpful!
Shopify App Store
September 1, 2023
Brad Jurga
All-Star Sporting Goods
Kickflip made everything easy, from designing the builder all the way through launch. We’re designing truly custom equipment for elite baseball players and this platform allows us to have better engagement and excitement around our brand. We’re seeing an instant return.
Shopify App Store
June 16, 2025
Kasper Taylor
CodedInk
My experience with both the product and the support team has been fantastic. The user interface and user experience are excellent. The features are powerful, and the WooCommerce integration is seamless and easy to set up.
G2.com
June 16, 2025
Saber Naceur
Vinylacy
By far, and I truly mean it, the best customizer available on Shopify. It’s easy to understand and manage, offers options for all types of products, and works extremely well. On top of that, it looks beautiful and feels premium. Highly recommended.
Shopify App Store
December 17, 2022
Jesus Guillermo de León Pérez
Dismo
Kickflip is a fantastic tool. It’s super intuitive, easy to use, and packed with capabilities. You don’t have to be an expert or have experience with other products to get started. The support team is also great and very responsive.
Shopify App Store
July 10, 2024
Frieder Urban
Era of Arc
We were looking for an uncomplicated configurator that was quick and easy to set up, offered plenty of design options, and worked reliably with fast loading times. We tested many configurators on the market, and with Kickflip, we found exactly what we needed.
Shopify App Store
October 10, 2024
John Taggart
Jack Harry and Ollie
What a great addition to our business Kickflip has been. It’s been fantastic to offer our customers the ability to personalize their orders. The support has been excellent, and we especially love that the pricing is tied to our success as customers make purchases.
Shopify App Store
May 7, 2021
TJ Garske
The Net Return
Kickflip saves our team a ton of time by eliminating the need to create custom mockups for customers. Customers can build their product themselves and place an order instantly, without any back-and-forth.
G2.com
January 26, 2026
Amin Hasani
CURVD
After extensive research into product customizer tools, we chose Kickflip for many reasons. We don’t like complicating simple tasks for customers, and Kickflip helped us simplify the process and create a seamless customer experience.
Shopify App Store
July 29, 2025