2D Product Configurator Explained: When It's Better Than 3D
Written by The Kickflip Team
February 2nd, 2026
Table Of Contents
- What Is a 2D Product Configurator?
- Common Pitfalls When Deciding Between 2D and 3D Configurators
- 2D vs 3D Product Configurators: Key Differences That Matter
- When 2D Wins and When 3D Is Worth It
- How Kickflip Enables a High-Quality 2D-First Strategy
- Transform Your Product Customization Strategy with Kickflip
- FAQs About 2D Product Configurators
As competition in ecommerce intensifies, product customization has emerged as a powerful way to drive engagement and conversion. When customers can see how a product comes together before they buy, they feel more confident in their choice and more connected to the brand. This has pushed many teams to invest in product configurators, sometimes assuming that more complex technologies, like 3D configurators, are the natural next step.
However, this assumption overlooks the hidden costs, extended timelines, and operational complexity that come with jumping straight into 3D technology. Many brands risk overbuilding before validating actual customer demand.
The central question isn't whether 3D looks more impressive. It's when a 2D product configurator actually delivers smarter, higher-ROI results.
In the sections below, we’ll break down the strengths and trade-offs of both 2D and 3D product configurators. You’ll see when each approach makes the most sense, the mistakes teams often make when choosing between them, and a practical way to evaluate which option fits your products, customer expectations, and growth objectives.
What Is a 2D Product Configurator?
A 2D product configurator is an online tool that enables your customers to personalize products through real-time manipulation of flat, layered images. Unlike traditional static product photos, these configurators use transparent PNG images as building blocks. Your customers see immediate visual feedback as they customize colors, materials, text, graphics, and components.
The technical foundation relies on layered assets, essentially digital cut-outs of each customizable component, that fit together like pieces of a puzzle, swapping in and out to generate the final product preview.
When a customer selects a red color option, the configurator instantly overlays the red layer onto the base product image. Text additions, logo uploads, and material changes happen through similar layering techniques, creating a live preview that accurately represents the final product.
Typical interactions include:
Color and material modifications
Adding or removing product components
Custom text placement
Image or logo uploads
The entire experience happens in real-time. Your customers see their design evolve as they make selections.
Technical Architecture: 2D vs 3D Differences
The fundamental difference between 2D and 3D configurators lies in their underlying technology and asset requirements. 2D configurators utilize layered image files, typically optimized PNG files. These images represent 3-5 static viewing angles, providing sufficient detail for most purchasing decisions.
3D configurators, conversely, require interactive 3D models in formats like glTF or GLB, complete with UV mapping, PBR texturing. While 3D offers full 360-degree rotation capabilities, this sophistication comes with significantly higher asset creation costs.
Common Pitfalls When Deciding Between 2D and 3D Configurators
Choosing 3D for the “Wow Factor” Instead of Conversion Impact
The most prevalent mistake in configurator selection involves choosing 3D technology solely for its premium appearance, rather than its impact on actual conversion metrics. This “wow factor” mentality often overlooks whether customers truly need additional viewing angles to make confident purchasing decisions.
Underestimating Asset Creation Cost and Complexity
Many teams drastically underestimate the asset creation and maintenance costs associated with 3D configurators. While initial 2D photography or rendering might cost $500–2,000 per product, 3D modeling, texturing, and optimization can easily reach $5,000–15,000 per product.
Underestimating Visual Realism and Perceived Quality
While 3D configurators can be immersive, they sometimes produce visuals that feel synthetic or toy-like, especially when lighting, materials, or textures are simplified for performance. In contrast, 2D configurators built from photography or high-quality 3D renderings often deliver a more photo-real result. For products where material quality, finishes, or fine details influence perceived value, this difference can impact trust and willingness to buy, even if the interaction itself feels less advanced.
Overlooking Mobile Performance Constraints
Mobile performance considerations are frequently missed during the decision process. With mobile traffic representing 60–70% of global ecommerce visits, the 3–5 second loading delays common with 3D configurators can significantly hurt conversion rates. These issues are often discovered only after substantial development investment.
Confusing Immersion With Purchase Confidence
Another common oversight is assuming that more immersive experiences automatically translate into greater purchase confidence. While 3D configurators can be highly engaging, they don’t necessarily provide clearer or more accurate product representation. In many cases, customers convert faster when the experience prioritizes clarity, speed, and predictability.
2D vs 3D Product Configurators: Key Differences That Matter
Visualization and User Experience Impact
The effectiveness of 2D versus 3D visualization depends heavily on what your customers need to feel confident in their purchase decisions. 2D excels when customers can adequately assess the product from standard viewing angles. Front, back, and side views typically provide sufficient information for apparel, accessories, printed materials, and many home decor items.
Research in consumer psychology reveals two critical concepts: vividness versus diagnosticity. While 3D visualization scores higher on vividness (how impressive or engaging the experience feels), 2D often wins on diagnosticity (how useful the information is for making purchase decisions). For products like custom t-shirts or sporting goods, a full 360 preview rarely provides additional decision-relevant information.
Choice confidence and trust are primary drivers of conversion. These often improve more through clear, fast-loading 2D experiences than through sophisticated 3D interfaces that may overwhelm or delay the decision process. When your customers can quickly visualize their customizations without waiting for model rendering, they maintain decision momentum more effectively.
Performance and Loading Time Considerations

Payload size is one of the most meaningful practical differences between 2D and 3D configurators. Optimized 2D image sets typically range from 200 KB to 3 MB total, while 3D models with textures often require 5–50 MB to download. This 10 to 25x difference has a direct impact on time-to-first-interaction, especially on mobile networks.
A key reason for this gap lies in how assets are loaded and made available to the user. 2D configurators can load and display an initial product view almost immediately, then progressively load the remaining images in the background as the user begins interacting. This allows the experience to feel responsive from the very first second.
3D configurators, on the other hand, typically need to load a much larger portion — if not all — of the core model, textures, and rendering logic upfront before meaningful interaction is possible. Until that initial load is complete, the experience often remains blocked.
As a result, 2D configurators typically become interactive within 1–3 seconds, while 3D experiences often require 5–15 seconds before users can meaningfully interact with the product, depending on device performance and network conditions. These seconds matter significantly. Research from industry experts like ConvertCalculator consistently demonstrates that each additional second of loading time correlates with 7-10% decreases in conversion rates.
Development Complexity and Resource Requirements
The asset creation pipeline for 2D configurators involves photography or 3D rendering to create base images, artwork separation to isolate customizable elements, and export optimization to create layered PNG files. This process typically requires 1-4 weeks per product and can be handled by most graphic designers with basic Photoshop skills.
3D configurator development requires specialized skills such as modeling, UV mapping, and PBR texturing, and typically relies on dedicated 3D artists rather than general graphic designers.
When 2D Wins and When 3D Is Worth It
2D and 3D configurators solve different problems. The right choice depends on your product, your customers, and the role visualization plays in the buying decision.
When 2D Configurators Are the Stronger Choice
When decisions are driven by surface-level choices
2D configurators excel when customers primarily need to evaluate colors, text, patterns, and placement on a product surface. In these scenarios, speed and clarity matter more than depth or rotation. Flat views (front, back, 3/4 or side) give customers exactly what they need to make confident choices without the extra cognitive effort of navigating a 3D environment.
When speed to market is a competitive advantage
2D approaches allow teams to launch faster, iterate more frequently, and validate demand without heavy upfront investment. This makes them particularly effective when timing matters.
When mobile performance and accessibility matter
For brands serving mobile-first or globally distributed audiences, 2D configurators offer consistent performance across devices and network conditions. Lightweight assets and predictable loading behavior ensure that customization remains usable and reliable, even on lower-end hardware or slower connections.
When the goal is learning before scaling
2D configurators offer a low-risk path to validate customization as a growth lever. Lower implementation and maintenance costs make it easier to measure real customer behavior, including usage, conversion impact, and drop-off points, before investing in more complex 3D experiences.
When 3D Configurators Justify Their Complexity
When the buying decision depends on spatial understanding
3D configurators make sense when customers must understand how a product exists in space. This includes situations where proportions, depth, rotation, or physical relationships directly influence whether the product will work as intended.
When interaction changes understanding, not just presentation
3D earns its complexity when interaction itself provides insight, rotating, exploding, or isolating parts to understand how a product is assembled, accessed, or maintained. This is common in technical or configurable products where internal relationships matter more than surface-level aesthetics. In these cases, immersion improves comprehension, not just visual appeal.
2D Asset Creation Best Practices
Strong 2D configurators start long before anything is uploaded into a platform. The quality, consistency, and structure of your visuals directly affect how fast the configurator feels and how confident customers are when using it.
Start With the Right Photography
Everything begins with good product photos. The goal is not artistic shots, but clean and consistent images that are easy to work with later.
Products should be photographed on a plain, neutral background, ideally white or light gray, with even lighting and minimal shadows. If your product has many components, each view should be taken from the same angle and distance so nothing shifts between shots.
Avoid very dark colors if you intend to offer dynamic coloring, where colors are applied digitally on top of the base image in real time as customers make selections. Starting from lighter, neutral photos ensures color changes appear accurate and consistent, and that customizable zones remain clearly visible rather than obscured by reflections, folds, or harsh lighting.
Taking multiple views such as front, back, side, or angled shots at this stage ensures you have the exact perspectives you want to show in the configurator.
Prepare and Separate Assets in Photoshop
Once photography is done, tools like Photoshop are used to turn those images into usable configurator assets.
Each customizable element must be cut out and isolated on its own layer. For example, on a sneaker, if customers can change the sole color, brand logo, and laces, each of those parts needs to be separated into its own layer. All layers must remain perfectly aligned, and share the same size, so they stack cleanly and render as a single, cohesive product preview.
For areas that will change color dynamically, you will need to desaturate the image to make it look white.
Make sure everything stays neatly organized using folders in your work file. This will make updates easier later on.
Exporting the Final Images
Final assets should be exported as transparent PNG files since transparency is essential for layering components correctly.
A resolution of around 1200 × 1200 pixels at 72 dpi provides a strong balance between visual clarity and performance. Images stay sharp on modern screens while remaining lightweight enough to load quickly on mobile devices.
Before uploading them in your configurator, you can compress your images using a tool like TinyPNG. This step often reduces file sizes significantly without visible quality loss and helps keep the configurator fast and responsive.
How Kickflip Enables a High-Quality 2D-First Strategy
Kickflip Platform Overview
Kickflip provides a no-code, visual 2D product configurator specifically designed for ecommerce brands operating on platforms like Shopify, WooCommerce, and Wix. The platform enables real-time previews across multiple customization types:
Text placement
Color modifications
Material or component changes
Image or logo uploads
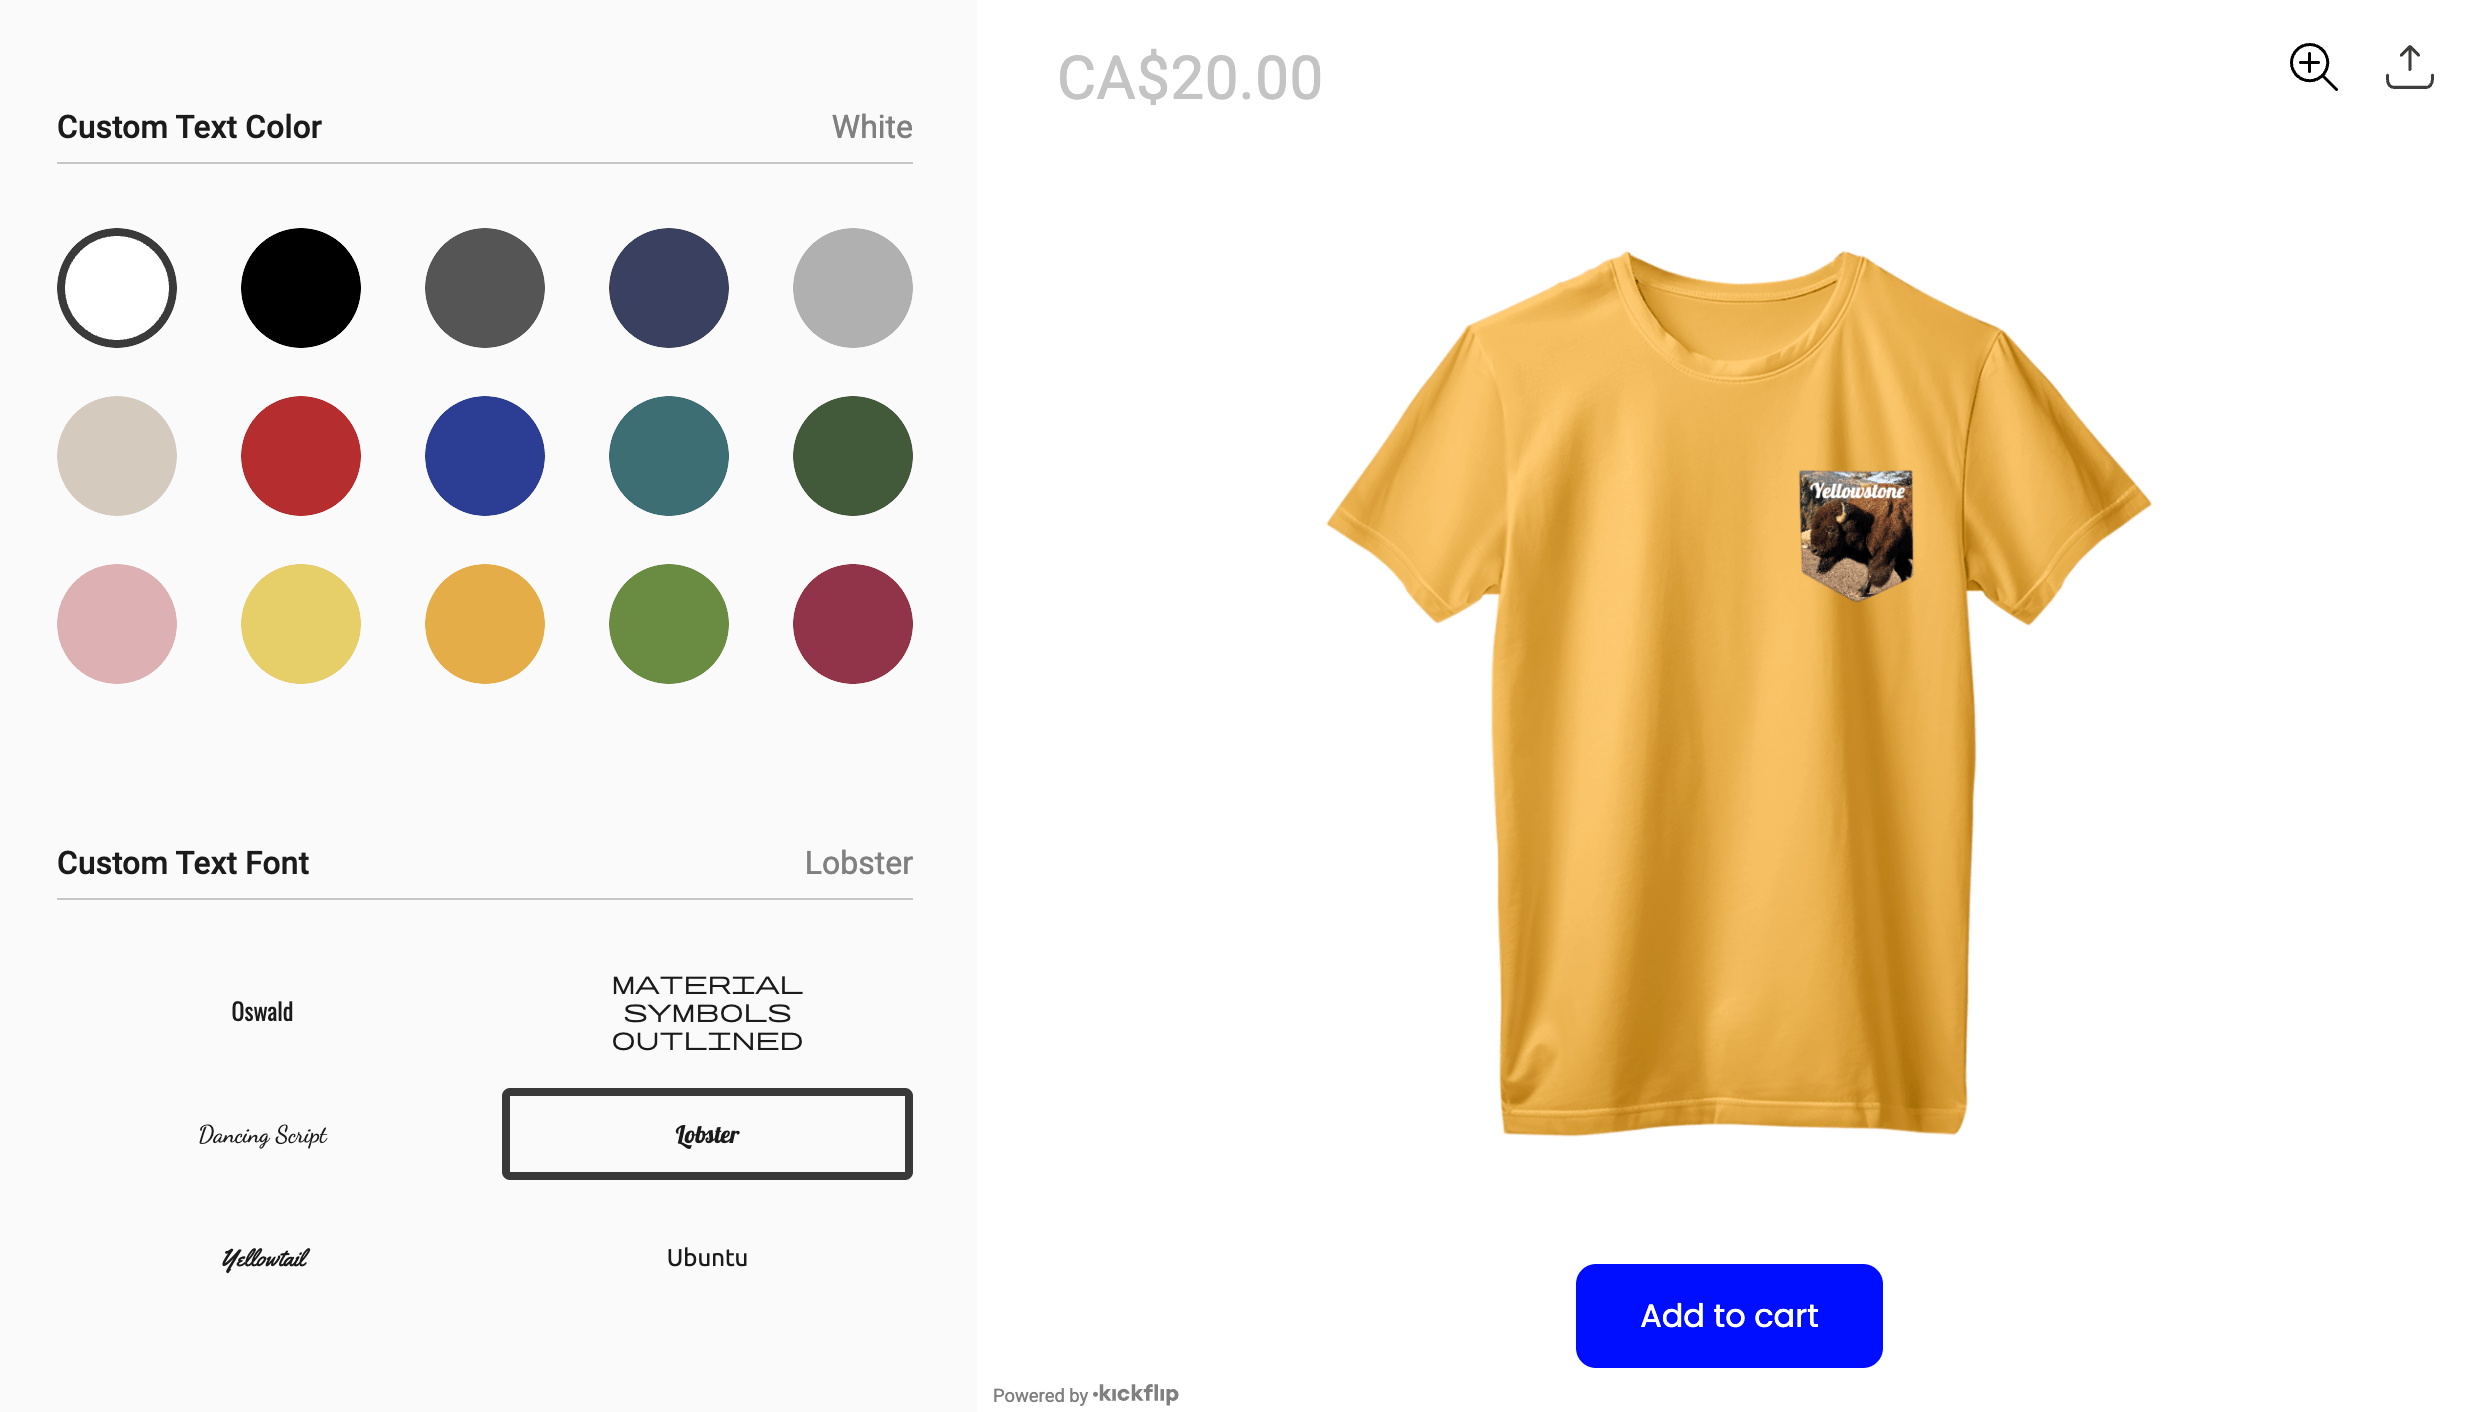
The platform serves diverse industries with particular strength in apparel customization, sporting googds personalization, accessories configuration, and furniture customization.
Implementation Process and Timeline
Building a 2D configurator with Kickflip follows a streamlined process designed for non-technical teams. The configurator creation workflow begins with uploading prepared product images, defining customization options through visual interfaces, and configuring pricing rules for different options.
The visual editor allows you to define clickable areas, color options, text fields, and upload zones without coding knowledge. Integration with ecommerce platforms happens through simple plugin installation, typically completing within hours rather than weeks.
Testing and refinement capabilities enable rapid iteration based on customer feedback. You can adjust layouts, modify options, and update pricing in real-time without development delays, supporting continuous optimization approaches.
Transform Your Product Customization Strategy with Kickflip
Choosing between 2D and 3D product configurators is ultimately a strategic decision, not a technological one. Each approach has strengths, trade-offs, and ideal use cases. What matters most is how well the configurator supports your customers’ decision-making, fits your product complexity, and aligns with your performance, budget, and time-to-market constraints.
Many brands find that 2D configurators offer a practical way to launch customization quickly, validate demand, and optimize conversion without introducing unnecessary complexity. Others discover that 3D becomes valuable when spatial understanding, interaction, or collaboration are central to the buying process.
Kickflip makes it possible to launch high-quality 2D configurators in weeks rather than months, with a strong focus on performance, mobile usability, and seamless ecommerce integration.
And while 2D remains the fastest and most reliable way to deliver results today, we’re also building what comes next. Our work on 3D is underway, designed to be just as thoughtful, just as performant, and to raise the bar for how immersive customization should actually work.
Stay tuned!
FAQs About 2D Product Configurators
When is a 2D configurator better than a 3D configurator?
A 2D configurator typically outperforms 3D when you need fast loading times across all devices, want to launch quickly with limited budgets, serve mobile-heavy audiences, or sell products that customers can adequately evaluate from standard viewing angles. Examples include apparel, accessories, printed materials, and most sporting goods where spatial relationships aren't critical to purchasing decisions.
Which products are best suited to a 2D product configurator?
Apparel and fashion accessories, sporting goods and team equipment, printed and promotional materials, home decor with simple customization needs, and accessories like bags, hats, or jewelry work excellently with 2D configurators. These products typically don't require complex spatial understanding or internal component visualization to make confident purchase decisions.
How difficult is it to set up a 2D configurator on Shopify?
With no-code platforms like Kickflip, setup typically takes hours to days rather than months. The process involves uploading prepared product images, defining customization options through visual interfaces, and installing simple plugins. No coding knowledge is required, and most teams can launch basic configurators within a week of starting the process.
Future reading
3D Product Configurator - Everything You Need to Know
Best Product Configurator Software: Expert Guide for Ecommerce, CPQ, and Manufacturing
How to Build a Product Configurator
Share This article

Written by The Kickflip Team
February 2nd, 2026
The Kickflip team is made up of ecommerce specialists, product experts, and engineers behind Kickflip, a product configurator platform for Shopify, WooCommerce, and Wix. Since 2010, we’ve helped thousands of brands scale personalized product experiences, from startups to Fortune 500 companies. On our blog, we share practical insights to help you improve the buying experience and grow your business with product customization.
Maarten Luyckx
Osaka World
The user-friendly interface of Kickflip, combined with excellent customer service, ensured that this project was brought to a successful and beautiful conclusion.
Shopify App Store
May 20, 2021
Marie-Laetitia Rossazza
My Dust Bag
It took me a long time to find the perfect customizer app, and I’m so happy to say that I finally did! Kickflip is truly the best app on the market. The front end and back end are excellent, and the team behind it is incredibly kind and helpful!
Shopify App Store
September 1, 2023
Brad Jurga
All-Star Sporting Goods
Kickflip made everything easy, from designing the builder all the way through launch. We’re designing truly custom equipment for elite baseball players and this platform allows us to have better engagement and excitement around our brand. We’re seeing an instant return.
Shopify App Store
June 16, 2025
Kasper Taylor
CodedInk
My experience with both the product and the support team has been fantastic. The user interface and user experience are excellent. The features are powerful, and the WooCommerce integration is seamless and easy to set up.
G2.com
June 16, 2025
Saber Naceur
Vinylacy
By far, and I truly mean it, the best customizer available on Shopify. It’s easy to understand and manage, offers options for all types of products, and works extremely well. On top of that, it looks beautiful and feels premium. Highly recommended.
Shopify App Store
December 17, 2022
Jesus Guillermo de León Pérez
Dismo
Kickflip is a fantastic tool. It’s super intuitive, easy to use, and packed with capabilities. You don’t have to be an expert or have experience with other products to get started. The support team is also great and very responsive.
Shopify App Store
July 10, 2024
Frieder Urban
Era of Arc
We were looking for an uncomplicated configurator that was quick and easy to set up, offered plenty of design options, and worked reliably with fast loading times. We tested many configurators on the market, and with Kickflip, we found exactly what we needed.
Shopify App Store
October 10, 2024
John Taggart
Jack Harry and Ollie
What a great addition to our business Kickflip has been. It’s been fantastic to offer our customers the ability to personalize their orders. The support has been excellent, and we especially love that the pricing is tied to our success as customers make purchases.
Shopify App Store
May 7, 2021
TJ Garske
The Net Return
Kickflip saves our team a ton of time by eliminating the need to create custom mockups for customers. Customers can build their product themselves and place an order instantly, without any back-and-forth.
G2.com
January 26, 2026
Amin Hasani
CURVD
After extensive research into product customizer tools, we chose Kickflip for many reasons. We don’t like complicating simple tasks for customers, and Kickflip helped us simplify the process and create a seamless customer experience.
Shopify App Store
July 29, 2025